 foxxcyber/docs
Marketing and newsletters
Build your newsletter list with consent, set up the signup form, write a campaign, send a test, schedule it, and read the send log.
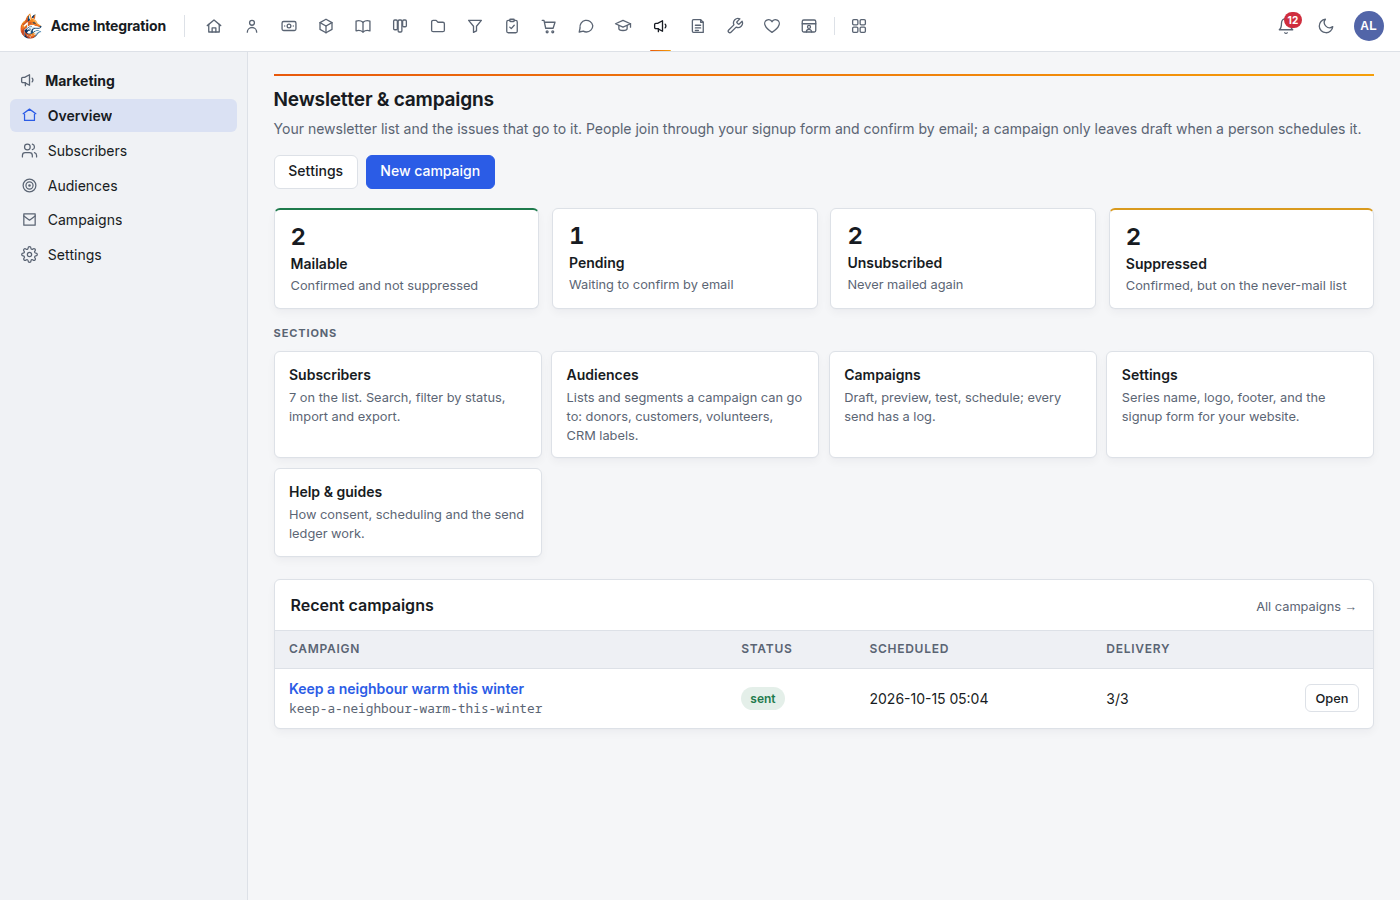
Marketing holds your newsletter list (the subscribers), the audiences a campaign can go to, and the campaigns themselves: each issue of your newsletter, and fundraising appeals.
Foxx HQ mails only people who said yes and confirmed it. Nobody is mailed because they happen to be a CRM contact.
Before you start
- Marketing must be on under Administration → Modules. See Modules.
- To see Marketing you must be in a department that enables it, or be a company administrator. To import, write, test, schedule or cancel campaigns and change the settings you must be a Marketing owner: a department lead, a holder of the Marketing admin grant, or a company administrator.
- To schedule a campaign, two things must be ready (the Marketing
overview lists them under Before the first send):
- Email transport: the organization's email must use Your own Resend key or Platform domain under Administration → Email. Campaigns can't go through an SMTP relay. See Email.
- Unsubscribe links: built by Foxx HQ. If the panel says "server setup", whoever runs your Foxx HQ server must set the address it names.
- You can draft campaigns and send yourself test copies before either is ready.
Set up the newsletter (owners)
Open Marketing → Settings.
- Sending readiness at the top says whether unsubscribe links and the email transport are ready. Email settings opens Administration → Email.
- Identity: the Series name (your newsletter's name), Logo URL (an image already hosted on your website; Foxx HQ never fetches anything itself), Site URL, and Footer text. Put your postal address in the footer.
- Consent: the Consent line, the sentence your signup form shows beside its button and records with every sign-up. Leave it blank to use a default naming your newsletter and organization.
- Link tagging: Extra UTM hosts, any other web addresses of yours whose links should get the campaign's tracking tags. Portal unsubscribe override is for Foxx Cyber's own portal only; leave it blank.
- Click Save settings.
The signup form
Under Signup form, click Create signup form. You get:
- a Hosted form address you can link to (Copy or Open);
- Embed in a frame: a snippet to paste into Squarespace, Wix, WordPress or any page that takes HTML;
- Embed as a plain form: the same as a plain HTML form.

Someone who signs up is pending until they confirm. Foxx HQ emails them a link, and the page it opens has a Confirm subscription button. Opening the link alone confirms nothing, because mail scanners open links by themselves; pressing the button does. The link lasts seven days, and an unconfirmed sign-up is removed after that.
New key replaces the form's key: embeds using the old one stop working. Turn off sign-up removes the form. Neither touches your existing subscribers or their unsubscribe links.
Subscribers
Marketing → Subscribers lists everyone on the newsletter list. The tiles at the top are filters. Click an address (owners) to see the evidence of how that person said yes.
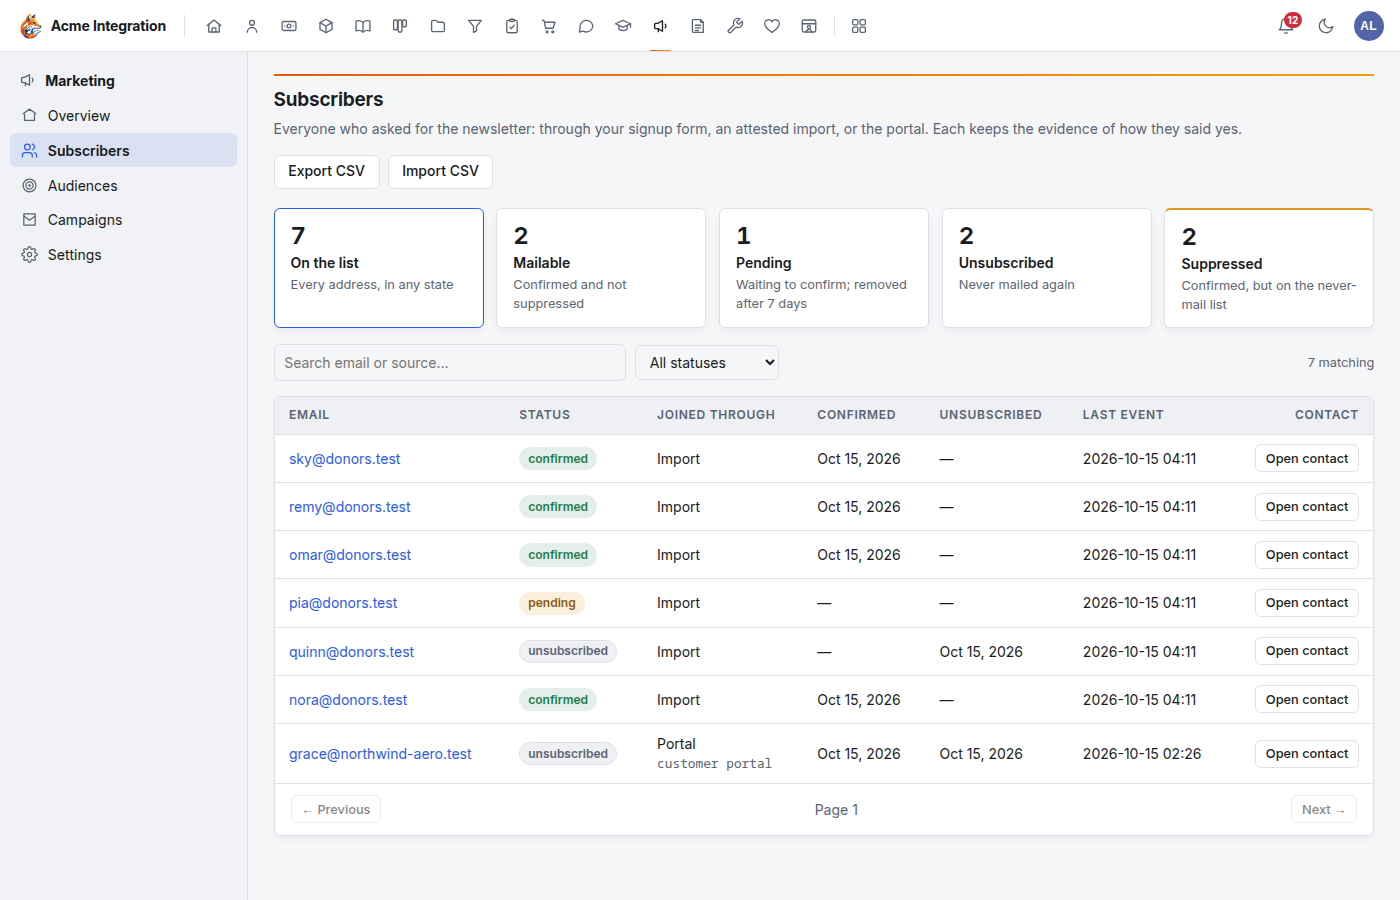
| Status | Means | Mailed? |
|---|---|---|
| Pending | Signed up, hasn't confirmed. | Never. |
| Confirmed | Signed up and confirmed. | Yes, unless the address is on the suppression list. |
| Unsubscribed | Left the list. | Never again. |
An unsubscribe also puts the address on the suppression list and sets Do not email on the linked CRM contact. It stops newsletters and campaigns only. Receipts, invoices, password resets and other account email still reach the person, as the law on commercial email allows (15 U.S.C. 7702). To stop those too, add the address to the suppression list yourself (see Email deliverability).
People join in four ways
- Your signup form (above).
- An import (owners): see below.
- Your own website, through the API: a website or app holding an integration key with the newsletter:write scope can ask Foxx HQ to send the confirmation email, report an unsubscribe, or report a subscription it already confirmed itself. See Integrations and API keys.
- The customer portal: a customer can subscribe or unsubscribe on its Newsletter page (see The customer portal).
Import a list (owners)
- Open Subscribers and click Import CSV.
- Under 1. Consent, fill in Where the list came from (the form, tool or event they signed up through), When they gave consent, and tick the Attestation: "These people asked to receive this newsletter from us, and I can show where and when." This statement is kept on every imported row.
- Under 2. File, choose a CSV with a header row. An email column is required; status, source, confirmed_at and unsubscribed_at are read when present. Rows with no status are treated as confirmed. Up to 8 MB and 50,000 rows.
- Click Import. The result shows rows read, Applied, Stale (older than what was already recorded) and Rejected, with the reason for each rejected row.
Import only people who asked to receive this newsletter. Imported rows marked as confirmed are mailed like anyone else.
Write a campaign (owners)
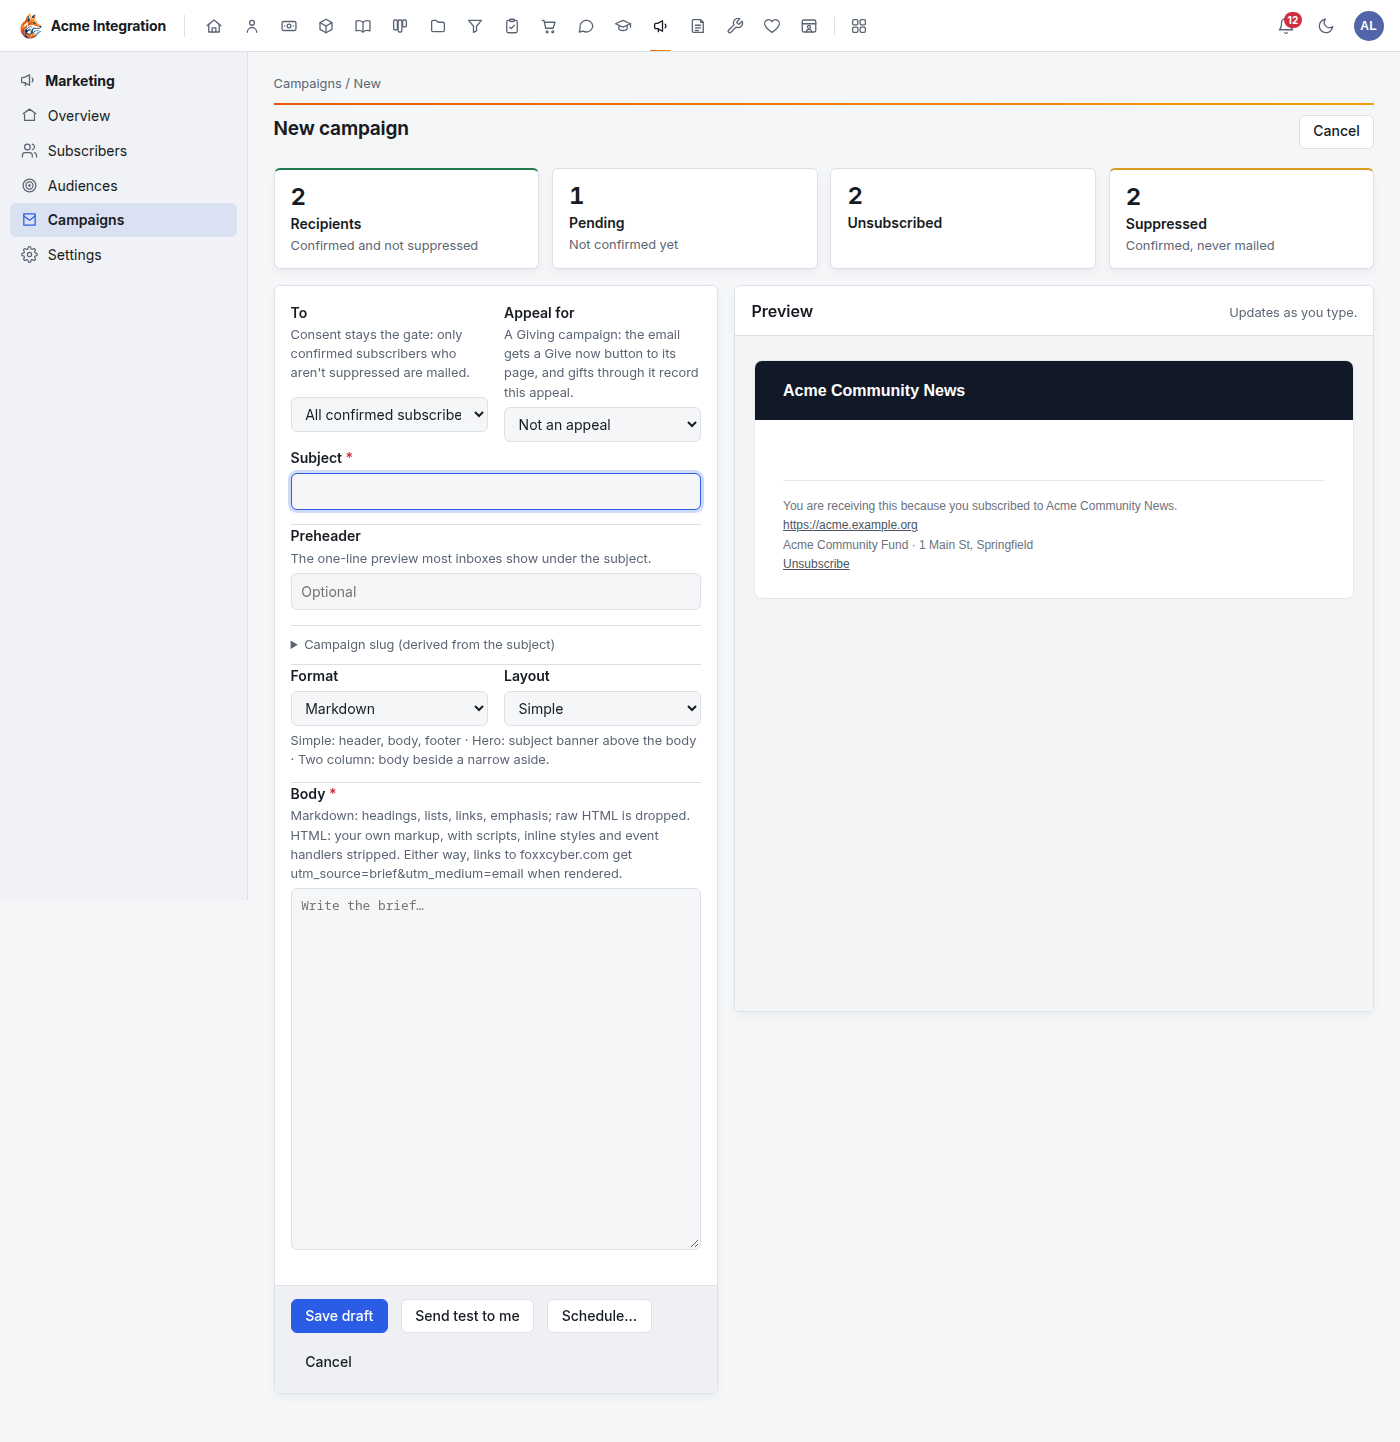
- Open Marketing and click New campaign (or Campaigns → New campaign). The tiles at the top show who a send would reach right now: Recipients (confirmed and not suppressed), Pending, Unsubscribed and Suppressed.
- Fill in the form:
- To: All confirmed subscribers, or one of your audiences. Either way only confirmed, unsuppressed subscribers are mailed. See Audiences and appeals.
- Appeal for (nonprofits with Giving on): leave it on Not an appeal, or pick a Giving campaign to make this a fundraising appeal. See Audiences and appeals.
- Subject, and an optional Preheader: the one-line preview most inboxes show under the subject.
- Campaign slug: the campaign's short name, used in link tracking. It is made from the subject; open it only to change it.
- Format: Markdown (headings, lists, links, emphasis; raw HTML is dropped) or HTML (your own markup; scripts, inline styles and event handlers are removed).
- Layout: Simple (header, body, footer), Hero (a banner with the subject above the body) or Two column (the body beside a narrow side column).
- Body: the newsletter itself.
- The Preview on the right shows the email as it will look, and updates as you type. Previewing saves nothing.
- Click Save draft, then Send test to me. That saves the draft and mails a copy to your own address. Check it in your inbox.
Links to your own website (the Site URL, and any Extra UTM hosts) get tracking tags in the sent email, so your website analytics can tell which campaign brought a visitor. Links to anyone else's site are left alone. Foxx HQ adds no tracking pixel, so opens are not counted.
Schedule and send
Scheduling is the human approval step. Tools can draft campaigns; only a person can schedule one.
- Open the draft. Click Schedule… on the compose page, or use the Schedule card on the campaign's page.
- Pick Send at on your own clock (your browser's time zone is shown in brackets). Everyone else sees the time in their own zone.
- Click Schedule send, or Send as soon as possible.
Scheduling freezes the copy, records you as the approver, and sets the time. A scheduled campaign can go Back to draft, or be cancelled with Cancel campaign.
What happens next:
- Within a minute of the time, Foxx HQ starts sending. If the campaign goes to a segment, who is in it is worked out at that moment.
- It sends in batches of 100, and checks every address's consent and the suppression list again before each batch.
- Every copy carries the subscriber's own unsubscribe link and the one-click unsubscribe headers mail apps use.
- While it sends, Cancel remaining skips what is still queued. Copies already handed to the email provider can't be recalled.
After the send
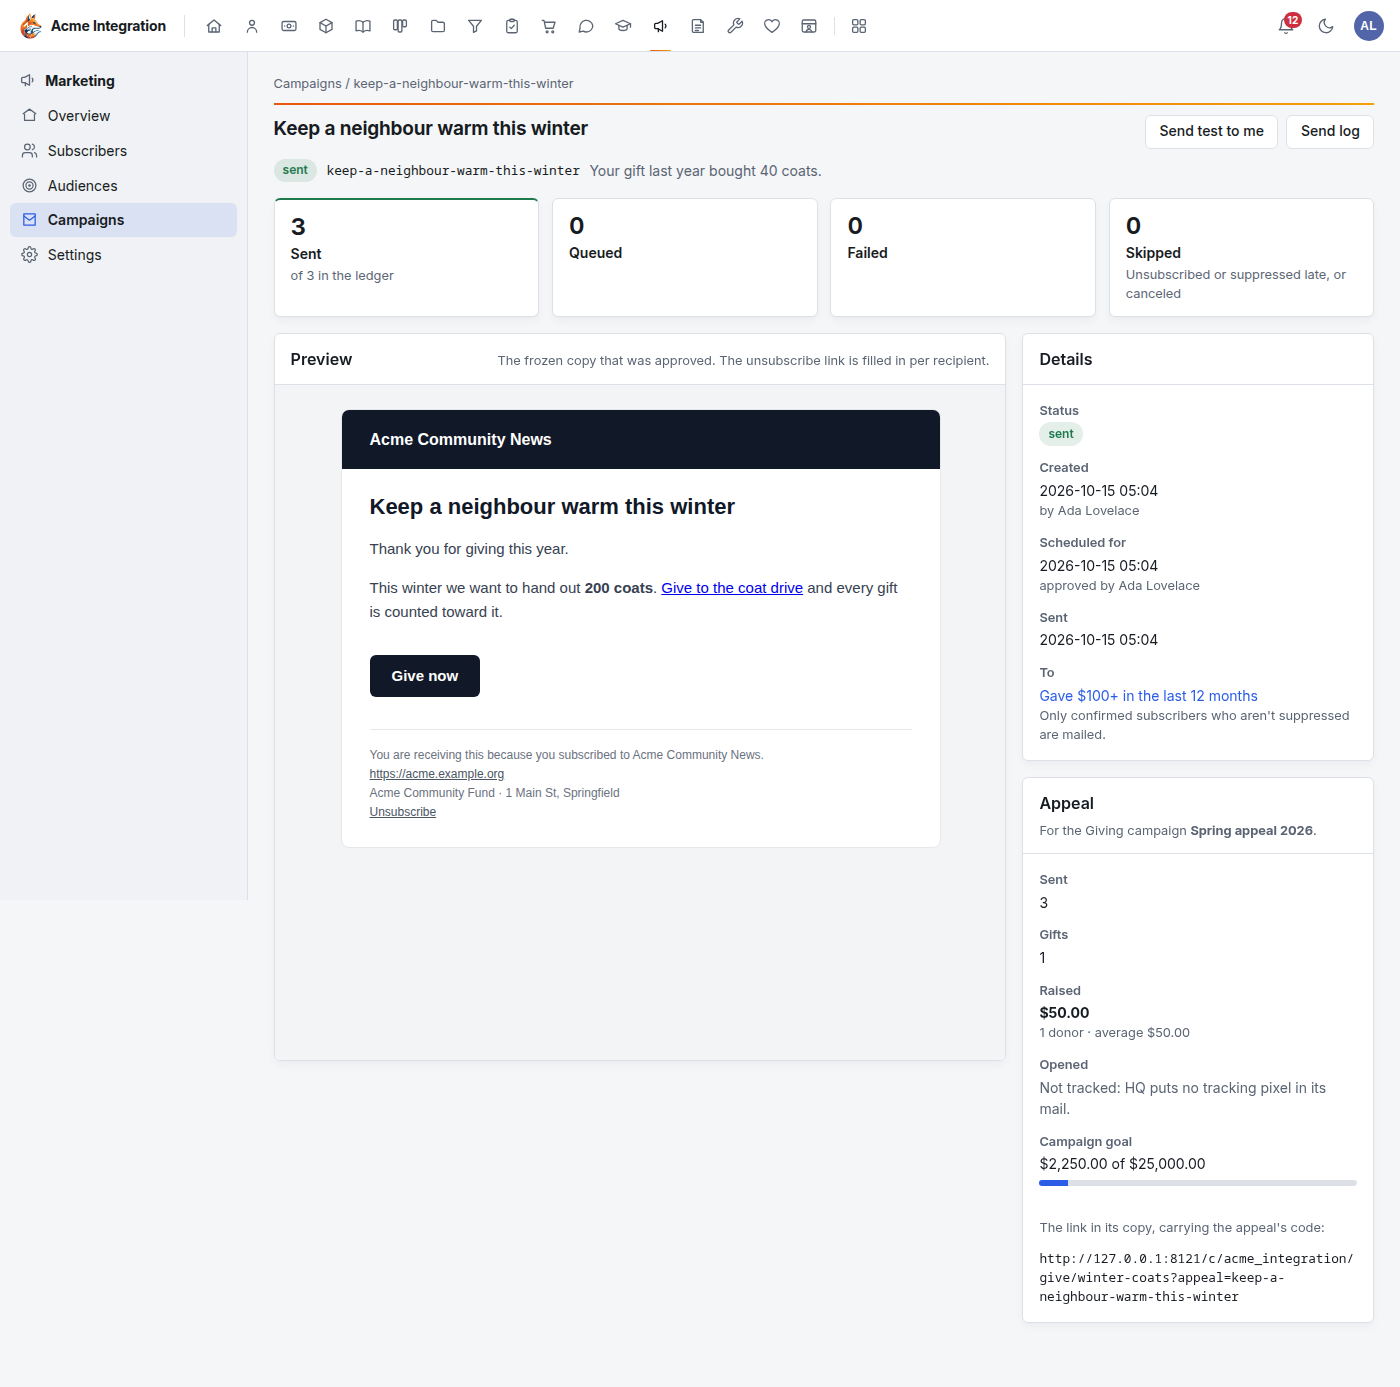
The campaign's page shows Sent, Queued, Failed and Skipped, the frozen copy that was approved, who approved it and when, and who it went to. Send log lists every recipient:
- sent: handed to the provider;
- failed: refused by the provider. Owners can Retry failed;
- skipped: unsubscribed or suppressed after scheduling, or cancelled.
How people leave the list
The unsubscribe link in each email opens a Foxx HQ page with one button; nothing changes until the person presses it. The same page lets someone who left subscribe again. That lifts the suppression their own unsubscribe created, but never a spam complaint or an address an administrator added.
Troubleshooting
"Marketing isn't in my menu." The module is off, or you aren't in a department that enables Marketing. Ask a company administrator.
"I can't see New campaign, Import CSV or Settings." Those belong to Marketing owners. Ask for the Marketing admin grant.
"There's no Schedule… button." Sending isn't ready. The Marketing overview's Before the first send panel, or the campaign's Schedule card, says what is missing: the email transport must be Resend or Platform, and unsubscribe links must be ready.
"The email transport is SMTP." Campaigns can't go through SMTP. Switch to Your own Resend key or Platform domain under Administration → Email.
"Unsubscribe links say server setup." Whoever runs your Foxx HQ server must set the address the panel names. This is not something you can change in the app.
"Recipients shows 0." Nobody is confirmed yet, or everyone is suppressed. Pending sign-ups must confirm from their email first.
"An appeal won't schedule." Its giving page isn't published. See Audiences and appeals.
"Someone says they never got the confirmation email." Check Administration → Email, and ask them to look in their spam folder. They can sign up again; the old link stops after seven days.