 foxxcyber/docs
Project Tracker
Create projects, raise and move issues on the board, search across projects with queries and saved filters, and set up workflows per issue type.
The Project Tracker is where teams plan and track work. Each
project has its own board, issue keys (such as PLAT-12), workflow,
cycles and settings. It works much like Jira.
Before you start
- Project Tracker must be on under Administration → Modules. Once it is on, everyone in the organization can use it.
- Who sees a project depends on its owner and visibility:
- A project is owned by the company, a department or a team.
- Members of the owning department work its issues with no extra setup. Its leads administer the project.
- Everyone else needs the project set to Organization visibility (read for everyone), a grant under Shared with, or to be added as a project member.
- Who can create projects: department leads (for their department), people with the Project Tracker admin grant, and company administrators.
Create a project
- Open Project Tracker (top bar or sidebar). The Projects page lists every project you can see.
- Click New project.
- Fill in:
- Key: 2 to 10 letters or digits, such as
HELPorOPS. Issues are numberedKEY-1,KEY-2and so on. You will type it often, so keep it short. - Name, and an optional Description.
- Owner: Company-wide, or a department or team. A department's members work the project's issues without a grant, and its lead administers it.
- Visibility: Restricted to the owner and people invited, or Organization: every tracker user can read it. You can change this later in Settings.
- Who can raise issues?: Anyone in the company suits an intake queue such as an IT helpdesk; outsiders can file requests and see only their own. Otherwise choose Project members only.
- Key: 2 to 10 letters or digits, such as
- Click Create project. You become the project's admin.
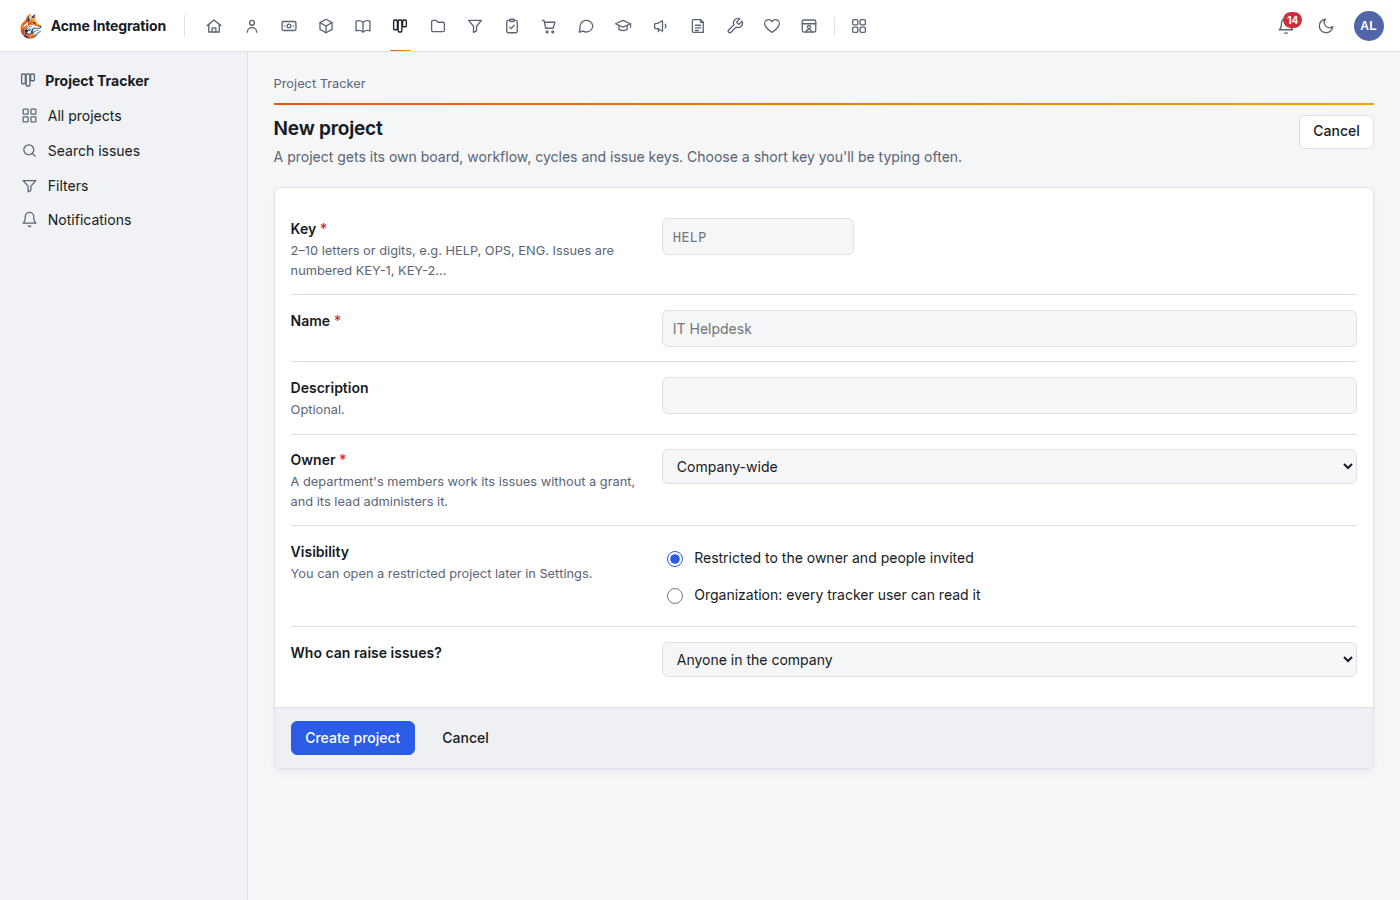
A new project starts Restricted. If you own it company-wide and leave it restricted, only you and the people you add can see it. Add members, or switch it to Organization in Settings.
Raise an issue
- Open the project. It opens on its Board.
- Click New issue.
- Fill in Summary (one line), Type (Task, Bug and so on; the type decides which extra fields the issue has), Priority, Labels and a Description (Markdown).
- Click Create issue, or Save as draft to keep it private to you and project admins until you publish it (find drafts under Drafts).
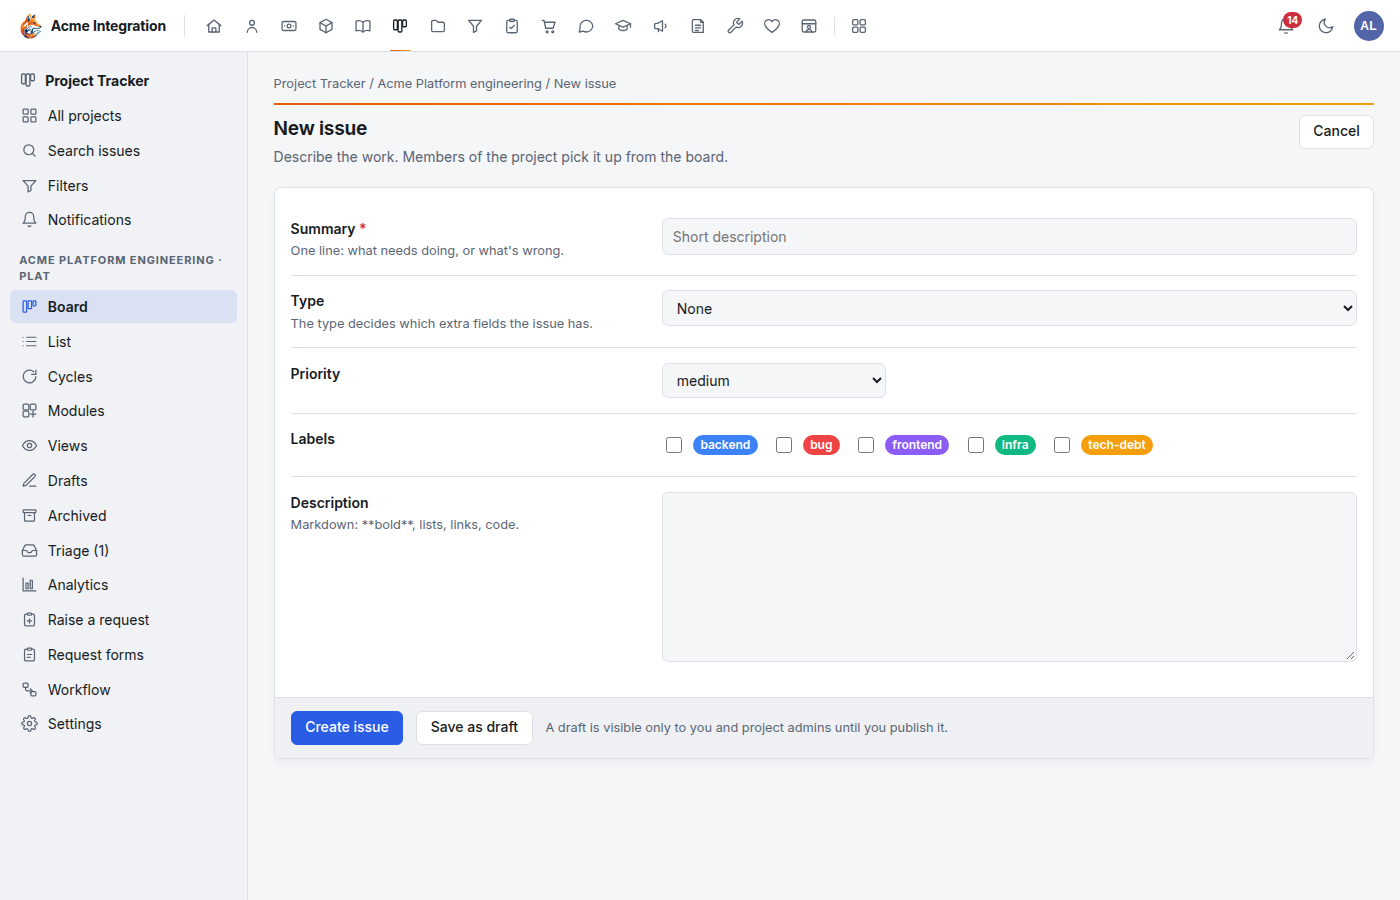
People outside the project use Raise a request instead (when the project lets anyone raise issues). Their requests land in Triage, where a member clicks Accept to make it an issue or Decline.
Work issues on the board
The Board shows every open issue in a lane per state.
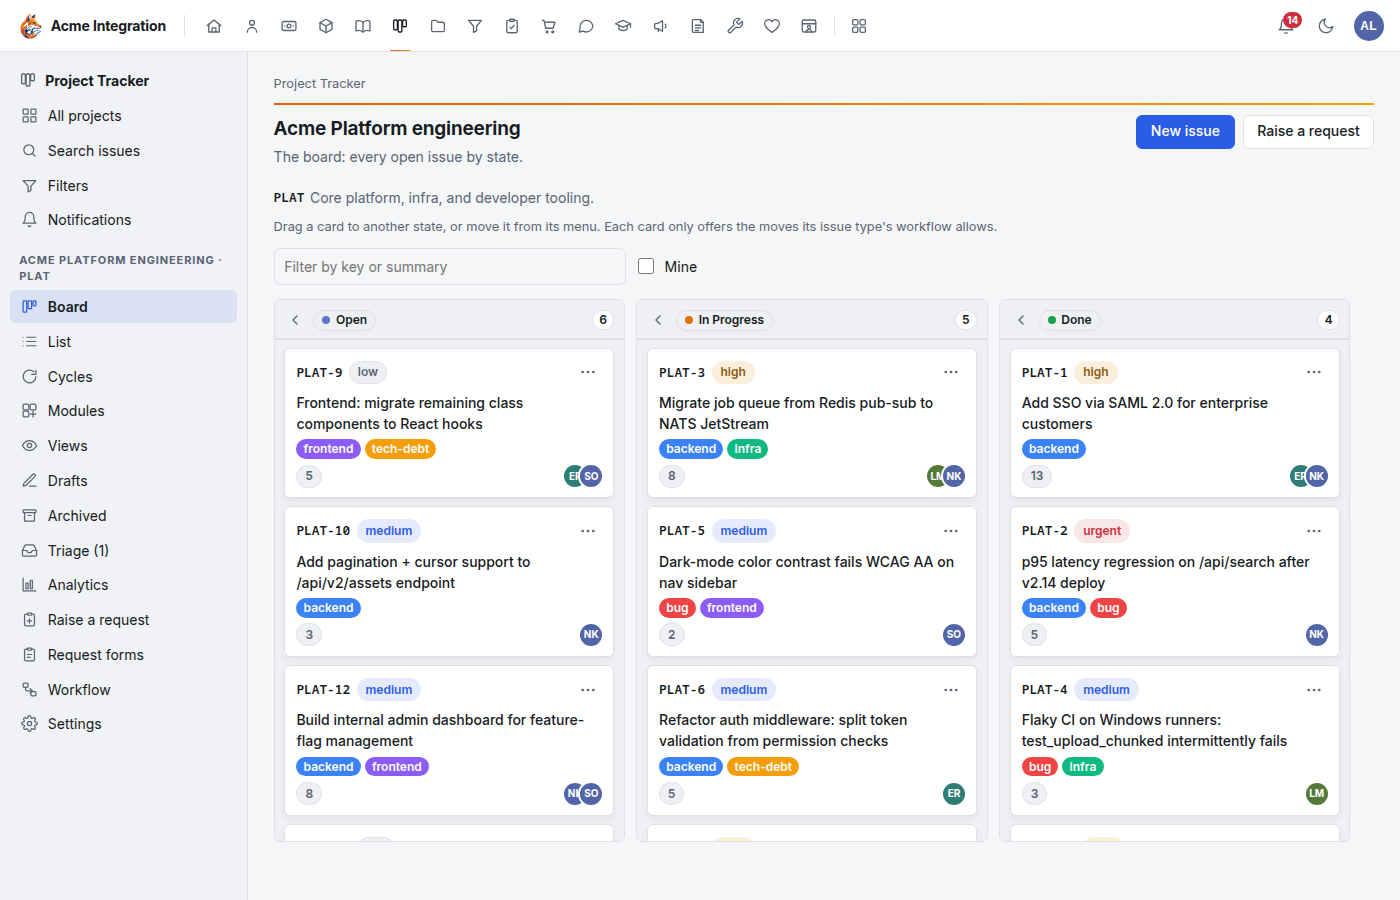
- Move an issue: drag its card to another lane, or open the card's ⋯ menu and pick Move to …. Only the moves the issue's workflow allows are offered.
- Find a card: type in Filter by key or summary, or tick Mine.
- List: the same issues as a table with filters for priority, label, assignee and estimate. Save as view keeps the filters so you can reopen them from Views.
The issue page
Click an issue's title to open it.
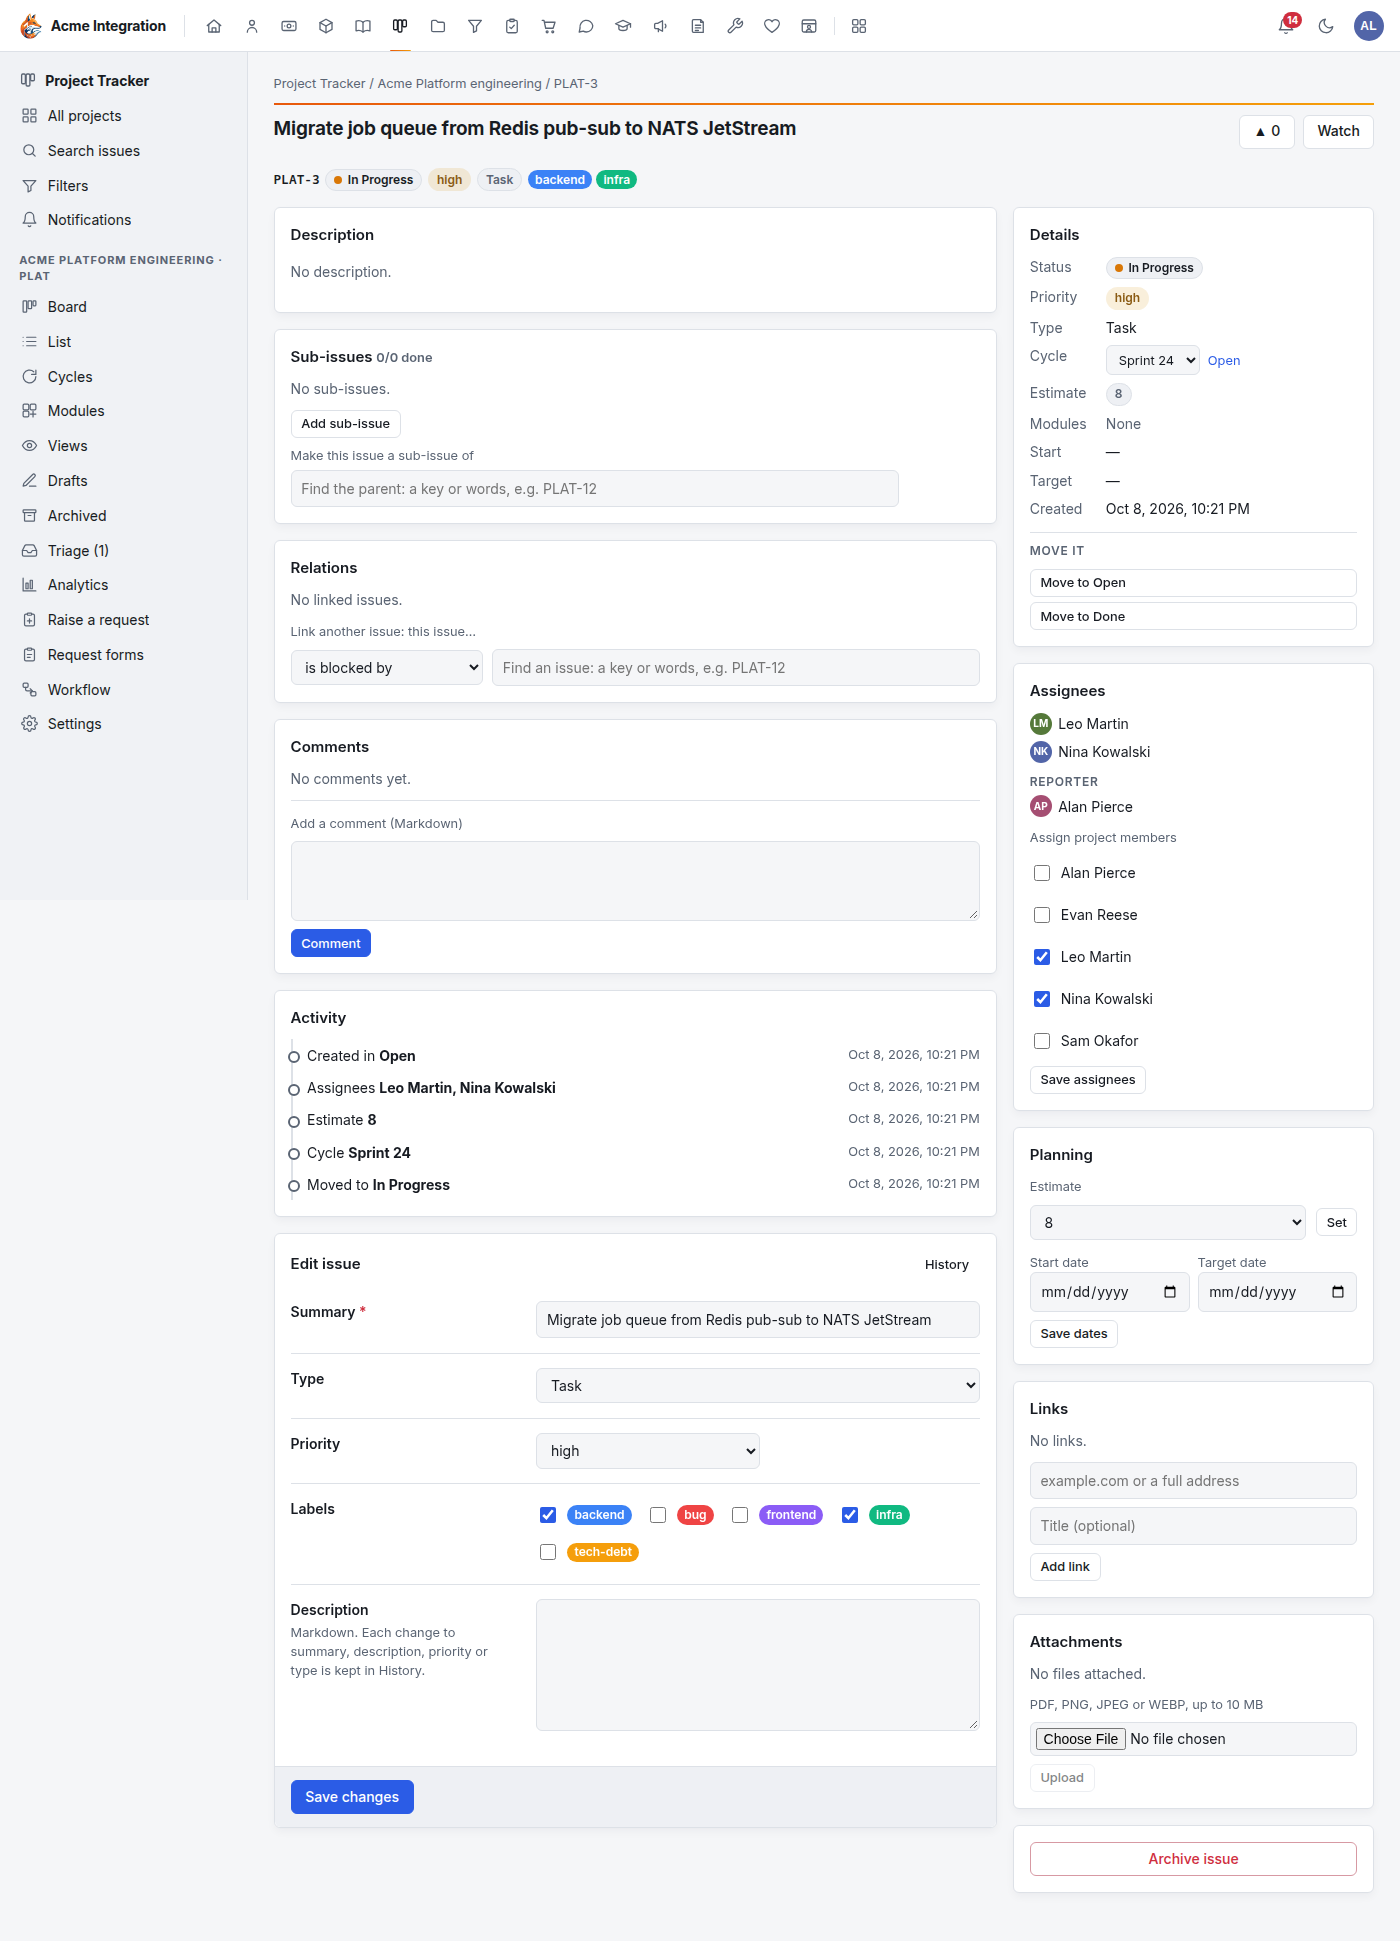
- Move it (right column): one button per allowed move, such as Move to Done. A move may ask for a comment first if the workflow requires one.
- Assignees: tick project members and click Save assignees.
- Planning: set the Estimate, Start date and Target date.
- Sub-issues and Relations (such as "is blocked by").
- Comments (Markdown), Links and Attachments (PDF, PNG, JPEG or WEBP, up to 10 MB).
- Watch (top right) to be notified of changes; ▲ to vote.
- Edit issue at the bottom changes the summary, type, priority, labels and description. Each change is kept in History.
- Archive issue hides it from the board without deleting it.
Plan with cycles, modules and views
From the project's menu in the sidebar:
- Cycles: time-boxed sprints. Click New cycle, give it a Name and optional dates (two dated cycles can't overlap), then set the cycle on each issue.
- Modules: group issues by theme across cycles, each with its own Lead (a project member) and dates.
- Views: saved list filters, Private (only me) or Public (everyone on the project).
- Analytics: charts of the project's work.
Search issues across projects
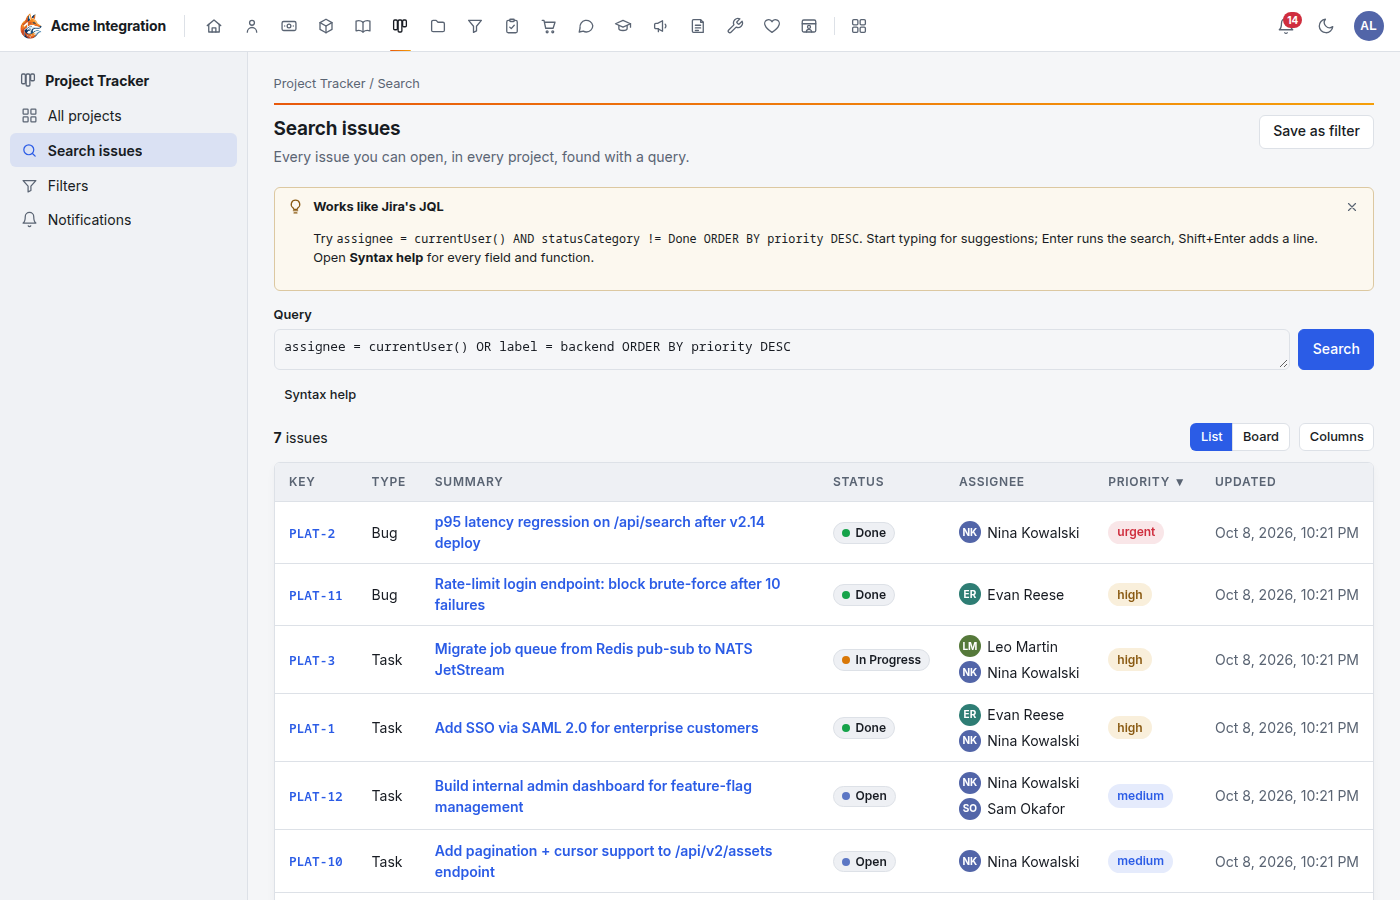
Search issues (in the Tracker's sidebar) finds issues across every project you can open, using a query language like Jira's JQL.
- Click Search issues.
- Type a query in Query, for example
assignee = currentUser() AND statusCategory != Done ORDER BY priority DESC. Suggestions appear as you type. Enter runs it; Shift+Enter adds a line. - Click Syntax help for every field, operator and function. Fields include project, key, summary, text, status, statusCategory, type, priority, assignee, reporter, label, cycle, module, parent, estimate, created, updated and due, plus your custom fields.
- Show the results as a List (choose Columns) or a Board (grouped by status, category, assignee, priority or type). Dragging a card on that board moves the issue through its own workflow.
Save a search as a filter
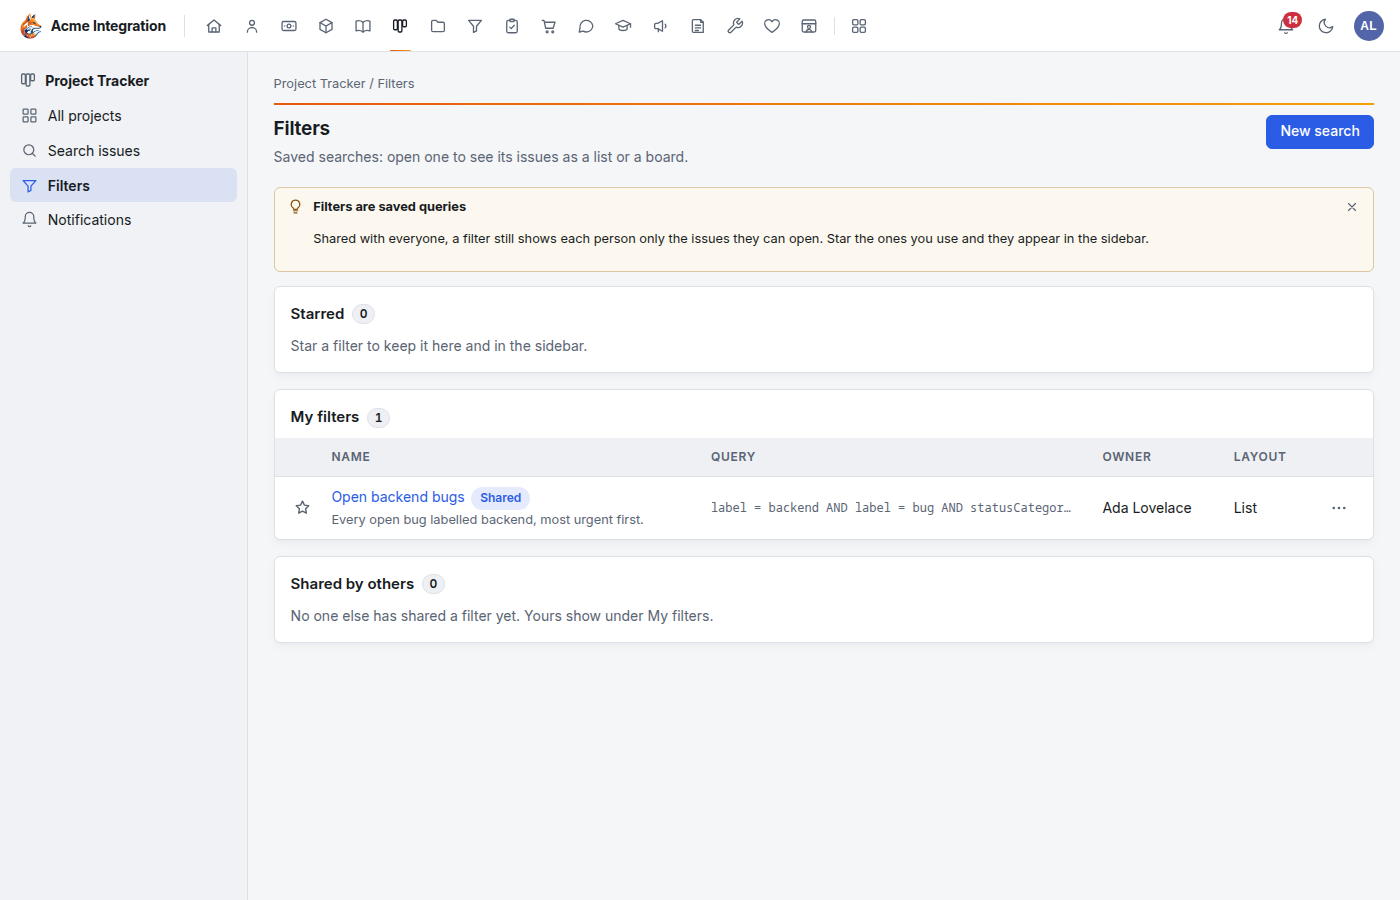
- Run your search, then click Save as filter.
- Give it a Name and optional Description.
- Under Who can open it, choose Only me or Everyone who uses the tracker. Shared or not, each person only ever sees the issues they can already open.
- Click Save filter. The filter is listed under Filters.
On the Filters page, click the ☆ next to a filter to star it: starred filters appear in the Tracker's sidebar. Any filter can also be added to your workspace as a Saved filter widget. See Workspace home.
Set up the workflow (project admins)
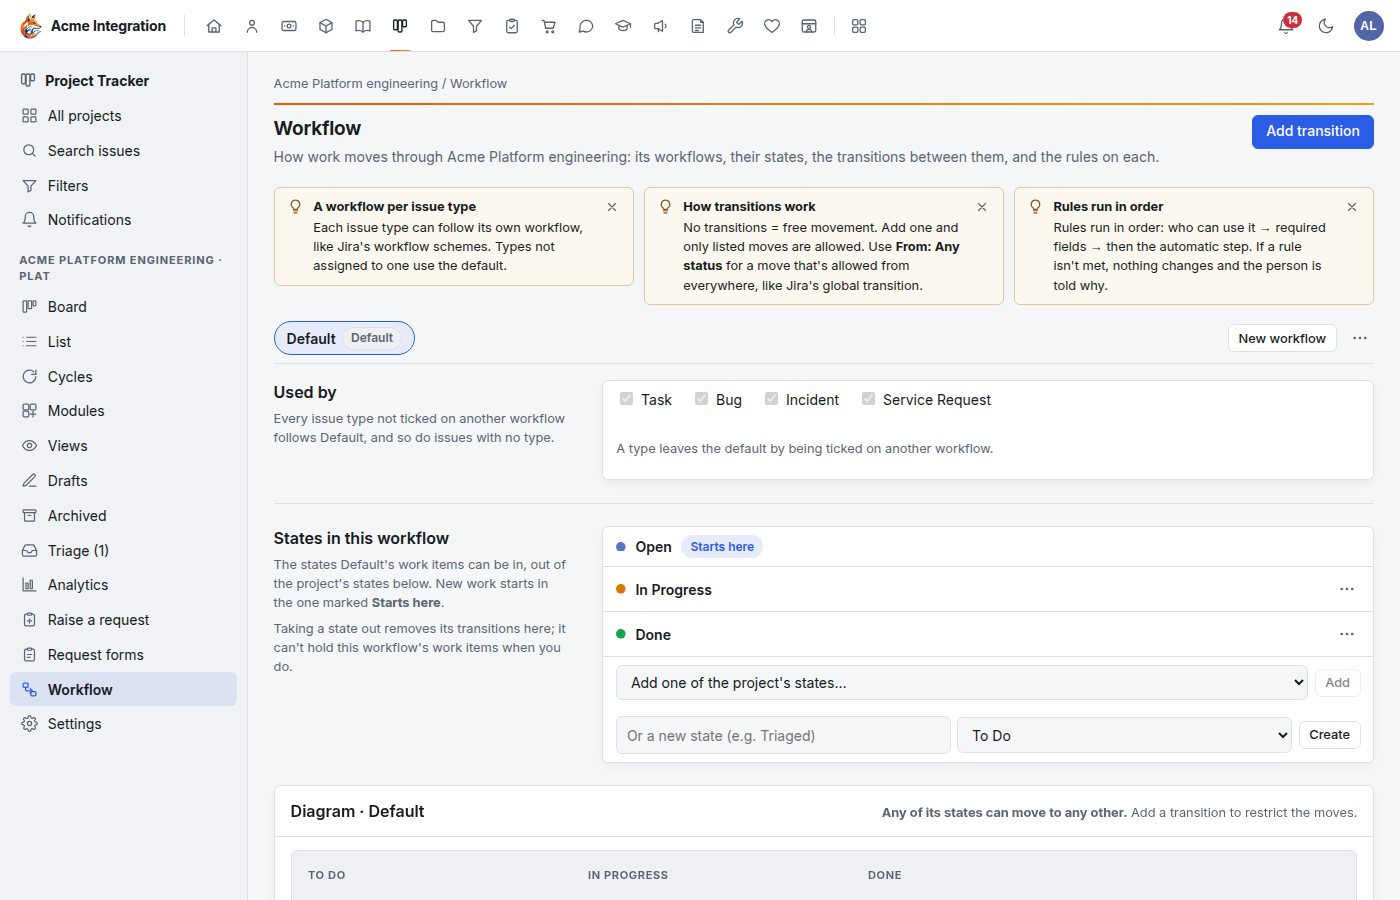
Each project's Workflow page (in the project's sidebar menu) shows how work moves: its workflows, their states, the transitions between them, and the rules on each. Members can read it; project admins change it. Every change is audited.
States and lanes
The project's States are the board's lanes. Each sits in one of five fixed groups: Backlog, To Do, In Progress, Done and Cancelled. The group sets the lane order and how analytics counts work (Done and Cancelled count as closed).
- Add a state with + Add state on its group.
- Rename, recolor, reorder or delete a state from its row.
- A state where any workflow starts can't be deleted, and a state that holds issues must be emptied first.
Use a template
Under Templates, click Apply… on Basic, Software development, Bug tracking or Service desk. It fills the workflow you are viewing in one step: it reuses states with matching names, adds missing ones, sets where new work starts, and replaces that workflow's transitions. It never deletes a state.
Restrict the moves with transitions
With no transitions, work moves freely between a workflow's states. As soon as you add one, only the listed moves are allowed.
- Click Add transition.
- Choose From (a state, or Any status to allow the move from everywhere) and the state it goes to.
- Optionally give it a Button name (otherwise it shows as "Move to …").
- Who can use it: anyone who can work the issue, its assignee, its reporter, or project admins.
- Requires: an assignee, an estimate, or a comment (the comment is asked for when someone makes the move).
- Then: assign it to the person moving it, assign it to its reporter, unassign everyone, or nothing else.
- Click Add transition in the box to save it.
Rules run in order: who can use it, then what it requires, then the automatic step. If a rule isn't met, nothing changes and the person is told why.
A different workflow per issue type
A project starts with one workflow, Default. To give bugs their own flow, for example:
- Click New workflow and start it empty, as a copy, or from a template.
- Under Used by, tick the issue types that follow it. A type follows one workflow at a time, so ticking it moves it off the one it followed before. Types not ticked anywhere, and issues with no type, follow Default.
- Under States in this workflow, add the states it uses. New issues start in the one marked Starts here.
When an issue's type changes to one whose workflow doesn't use its current state, the issue page asks where it should go. Deleting a workflow asks the same for every stranded state. The default workflow can't be deleted.
Project settings (project admins)
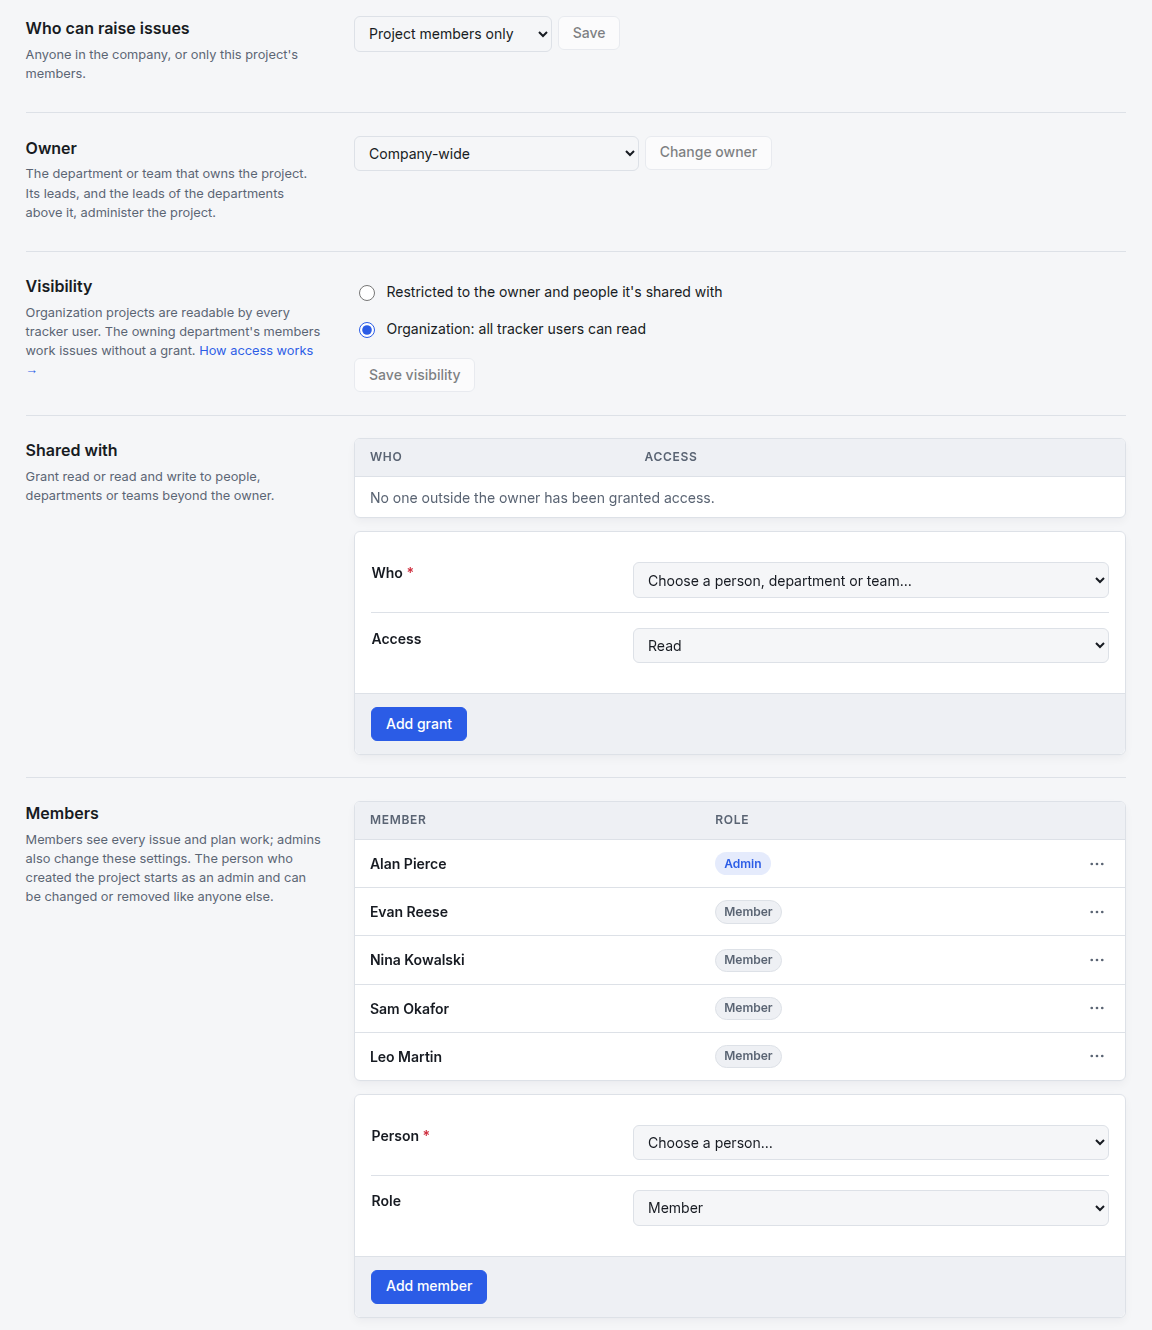
Settings (in the project's sidebar menu) holds issue types, custom fields (and which fields each type shows), labels, estimates, request forms, and access:
- Who can raise issues: anyone in the company, or project members only.
- Owner: change the owning department or team.
- Visibility: Restricted to the owner and people it's shared with, or Organization: all tracker users can read.
- Shared with: give a person, department or team Read or read and write access.
- Members: add people as Member or Admin. Members see every issue and plan work; admins also change settings.
- Danger zone → Archive project: hides it and makes it read-only. Nothing is deleted.
Troubleshooting
I can't see a project. It is restricted and you aren't in its owning department, a member, or granted access. Ask a project admin to add you under Settings → Members or Shared with.
There is no New project button. Only department leads, Project Tracker admins and company administrators can create projects.
A card won't move to the lane I want. The issue's workflow has transitions and that move isn't one of them, or a rule blocks you (for example, only the assignee may use it, or it needs an estimate first). The card's menu only offers allowed moves. A project admin can check the Workflow page.
I can't see Workflow or Settings in the project menu. Settings is for project admins. Workflow appears for people who can see all of the project's work.
My search shows an error. The query has a typo. Open Syntax help for the exact field names.
Someone outside the project raised a request and it isn't on the board. It is waiting in Triage. Accept it there.
Every project is archived. A project admin, company administrator or Project Tracker admin can restore it from its Settings.