 foxxcyber/docs
Onboard a new employee, start to finish
Every step from an empty HR area to a new hire's first day: skills, job profiles, the onboarding checklist, hiring with a start date, and the record HR keeps.
Onboarding in Foxx HQ runs through Hiring, even when you have already chosen the person. Hiring someone from an opening creates their account, fills in their HR record and starts their onboarding checklist by itself. Creating a bare account under Administration → Users leaves all of that for you to do by hand.
This page puts the steps in order. Steps 1 to 4 are set up once. Steps 5 to 10 are what you do for each new person.
Before you start
- You are a company administrator or hold the HR admin grant. Department leads with HR enabled can hire and onboard people for their own departments, but not do the setup. See Human Resources overview.
- Human Resources is turned on under Administration → Modules. See Modules.
- Email is set up under Administration → Email. The invitation in step 7 is emailed. Without email the hire is recorded but nothing is sent. See Email.
- Your departments exist, with their members and leads. Leads approve their people's leave, timecards and expenses. See Users, departments and teams.
Human Resources is behind the person icon in the top bar. The screenshots on this page come from a demo organization.
1. Build the skill catalog
Skills are what people rate themselves on, what job profiles require and what evaluations assess.
- Open Human Resources → Skills & job profiles.
- Proficiency levels: there are always five ranks. Click Rename to change a label. The defaults are Aware, Working, Proficient, Advanced and Expert.
- Categories: type a name under New category and click Add category. Categories only group skills for reading.
- Skills: enter the Label, an optional Description, choose a Category and click Add skill. Repeat for each skill.
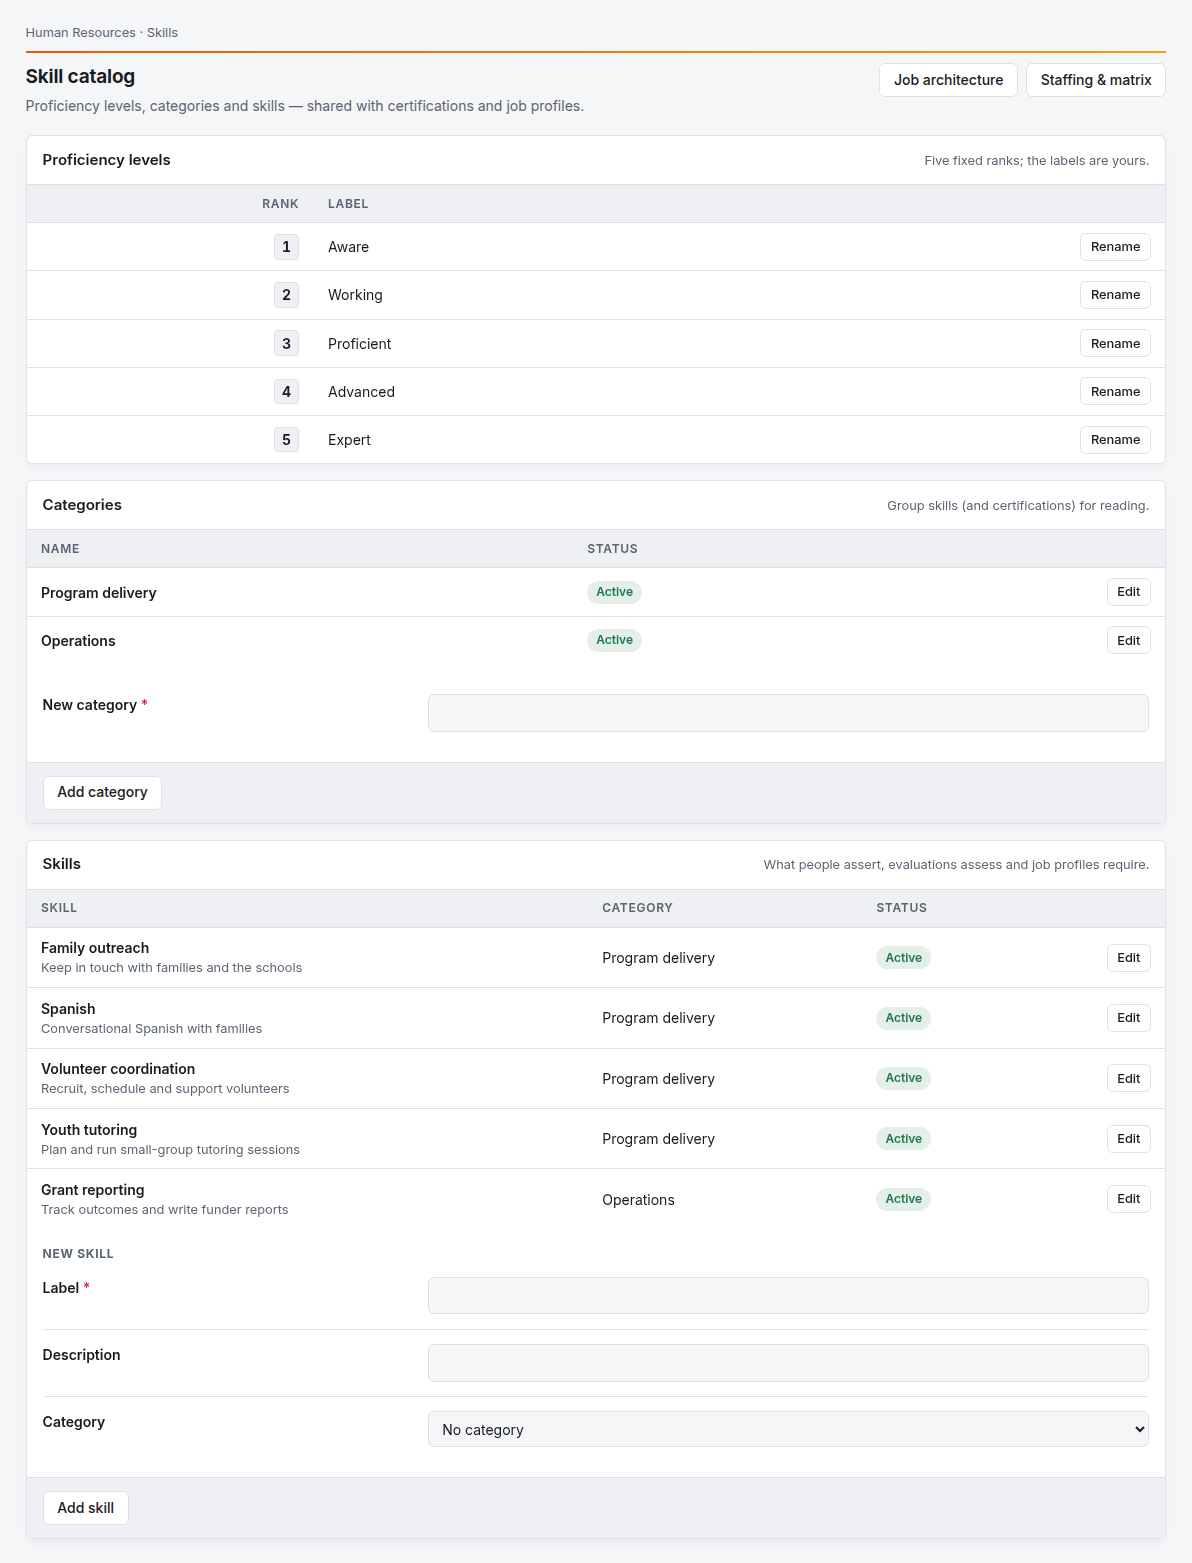
How to tell it worked: each skill is listed with its category and an Active badge.
Skills and categories can't be imported or deleted. To retire one, click Edit and untick In use. It stays on record but is no longer offered.
2. Describe each role as a job profile
A job profile is a role: the skills and certifications it needs. A new hire takes on the profile of the opening they were hired from, and their My gap page compares their skills against it.
- On the skill catalog, click Job architecture.
- Optional: under Job families, add a family such as Programs to group related roles.
- Under New job profile, enter the Title, choose the Family, and fill in Grade and Level rank if you use them. Click Create profile. The profile opens.
- Under Require a skill, choose the Skill, the Required level and the Weight, then click Add required skill. Required skills count toward readiness; Preferred ones don't. Repeat for each skill.
- To require a certification, add it to Human Resources → Certification catalog first, then choose it under Required certifications.
- In the Profile card, optionally set the Department, the Next role (the step up the career ladder), a description and the responsibilities.
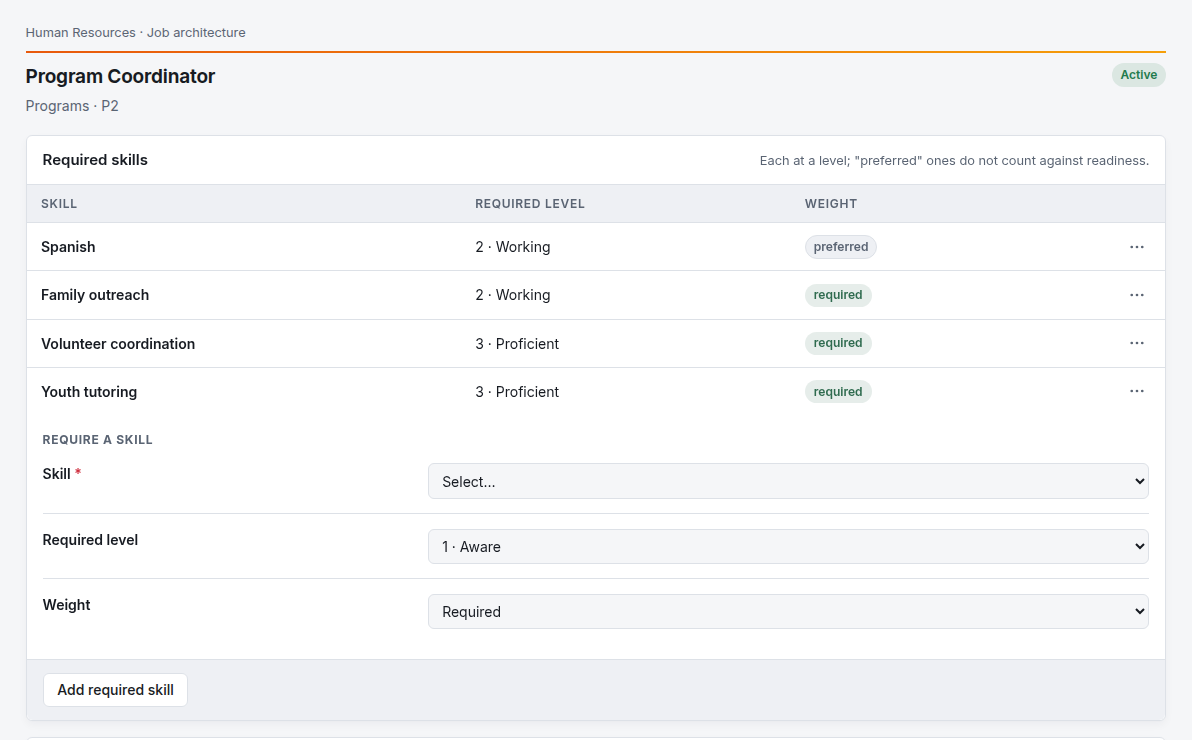
How to tell it worked: the Required skills table lists each skill with its level and weight.
3. Set up the onboarding checklist
Every new hire's onboarding is a copy of this checklist, taken when their onboarding starts. Editing it later doesn't change onboardings already running.
- Open Human Resources → Onboarding and click Edit checklist template.
- Foxx HQ starts you with seven tasks: offer letter and NDA, I-9, background check, laptop and accounts, security awareness training, payroll and benefits, and a manager introduction. Use … on a row to Edit or Delete it.
- To add a task, enter its Title, choose who is Responsible (hr, it, manager or employee) and click Add task.
- Optional: choose a Linked form. The task then completes by itself when the new hire submits that form, and the form waits in their Inbox. Build and publish the form in Forms first.
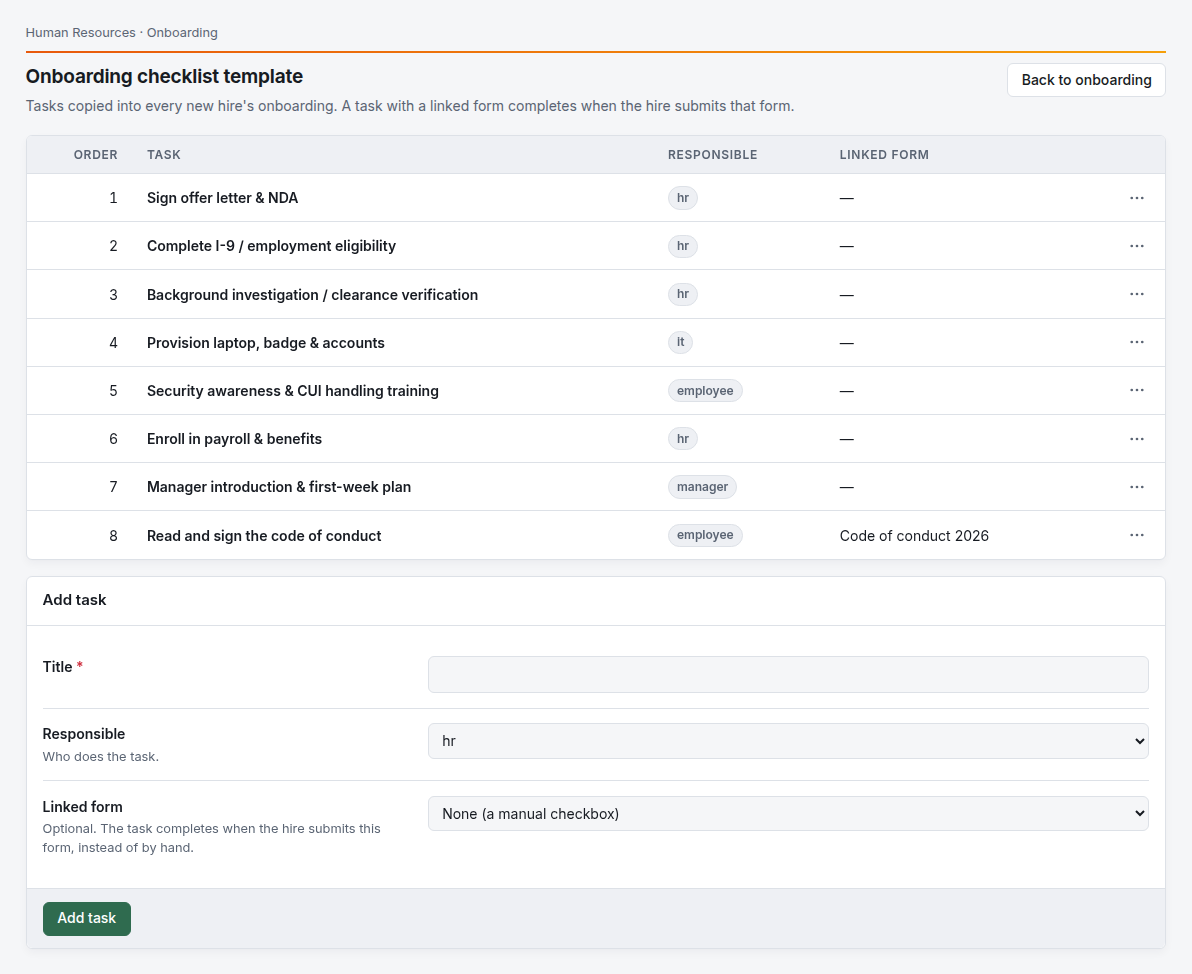
Responsible is a label. Foxx HQ doesn't notify IT or the manager about their tasks, so tell them yourself.
4. Set up time and leave
A new hire's first timecard needs charge codes to book hours against, and a leave request needs leave types. Set them up once under Human Resources → Charge codes and Leave types & balances. See Time and leave.
If you offer benefits, activate a plan year under Benefits admin. Every hire from step 7 onward then gets a 30-day enrollment window.
5. Create an opening for the role
Do this even when you have already chosen the person. The opening is where their job title, department and job profile come from.
- Open Human Resources → Hiring and click New opening.
- Enter the Title (it becomes their job title), choose the Employment type, the Job profile from step 2, and the Department they will join.
- Click Create opening.
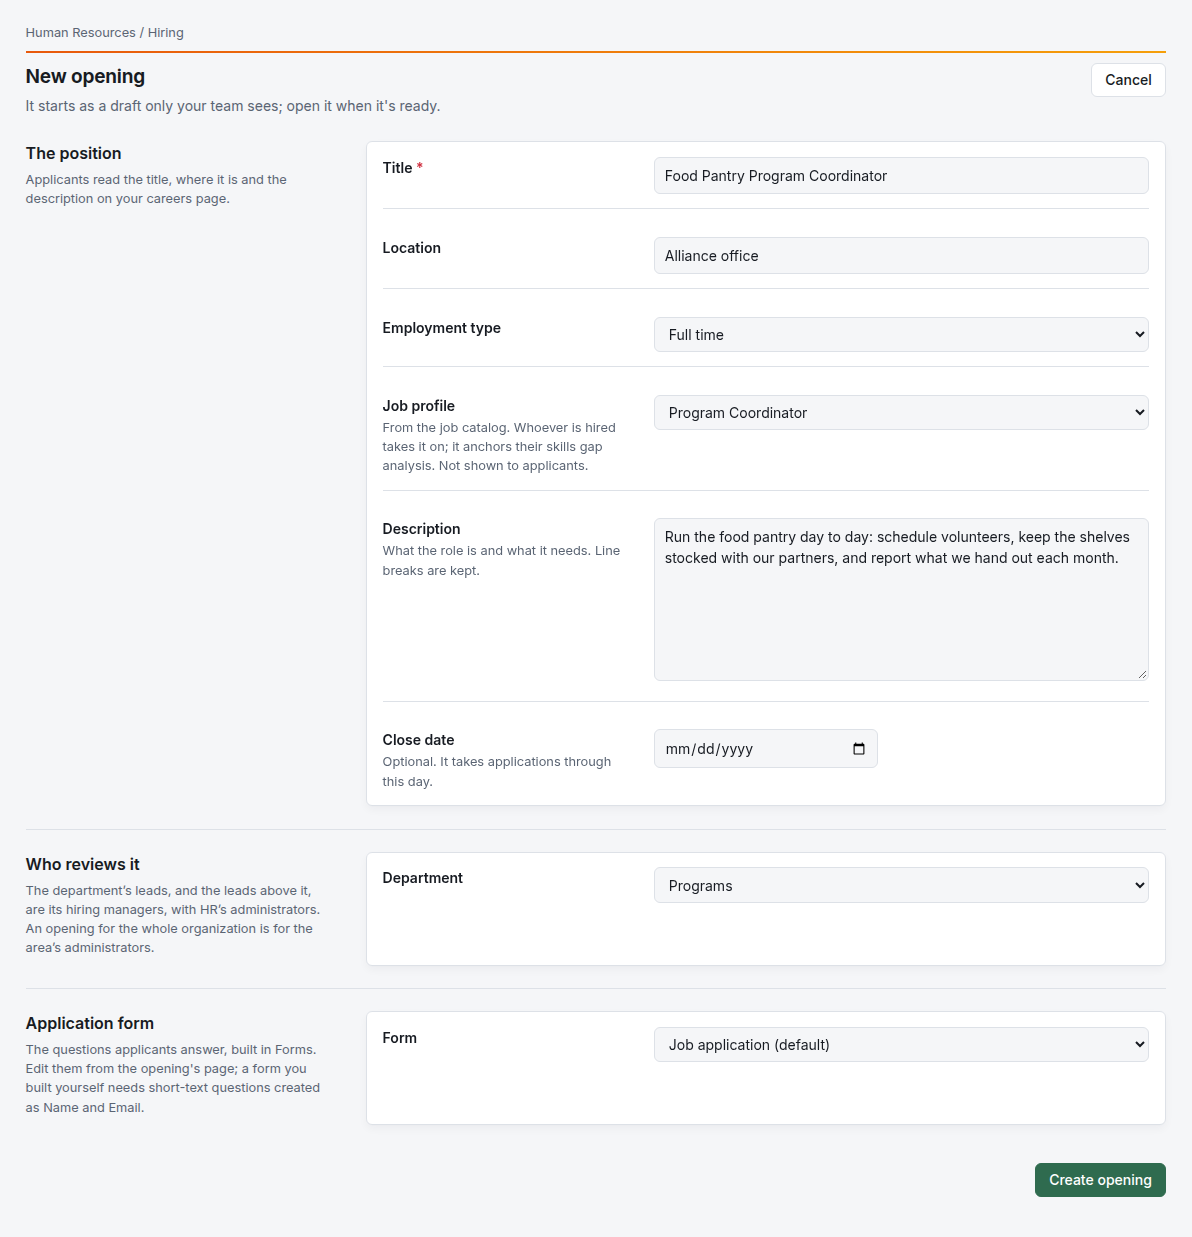
A new opening is a draft: only your team sees it, and it isn't on the careers page. If you have already chosen the person, leave it as a draft. To recruit, open it for applications; see Hiring.
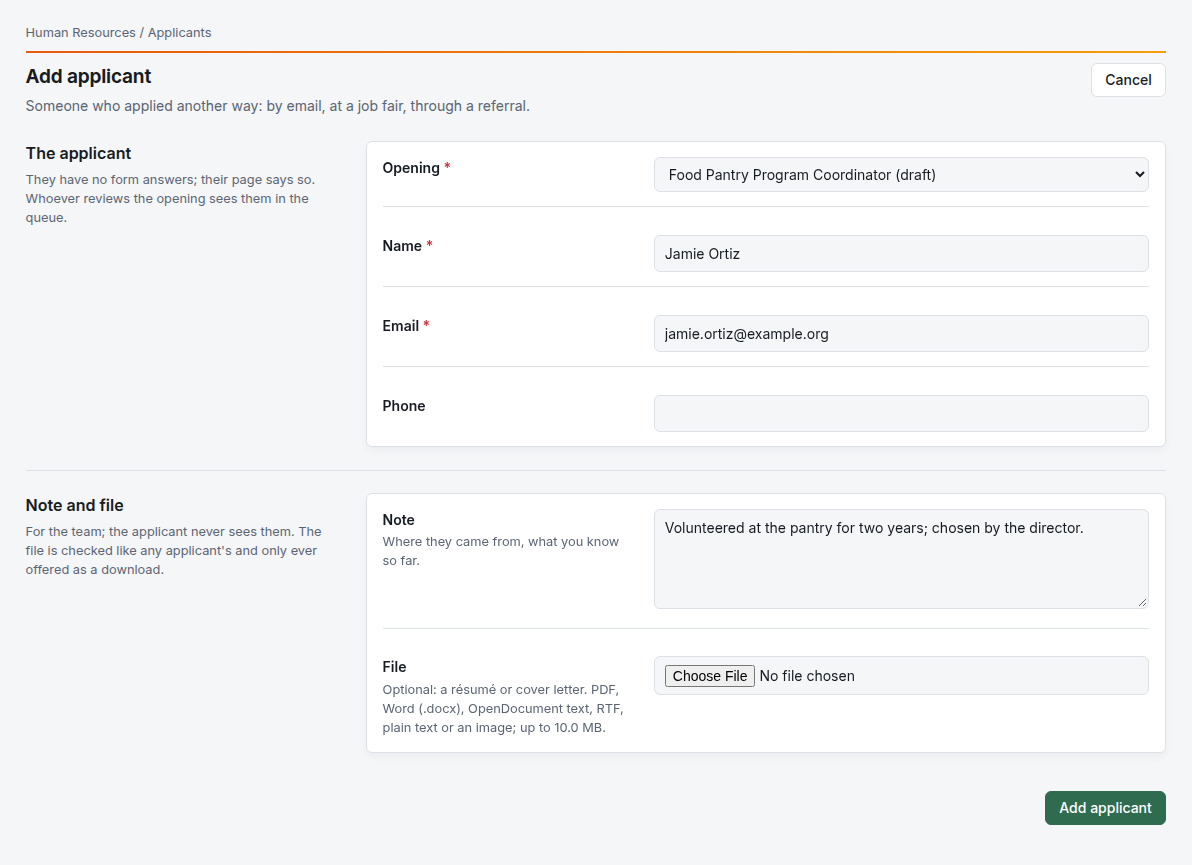
6. Add the person as an applicant
- Open Human Resources → Hiring → All applicants and click Add applicant.
- Choose the Opening, and enter their Name and the Email they will sign in with. Add a Note if you like.
- Click Add applicant. Their applicant page opens.
7. Hire them, with their start date
- On the applicant's page, click Hire….
- Enter their Start date. It becomes their hire date and the start of their first position. Leave it empty to use the day they accept the invitation.
- Click Hire and invite.
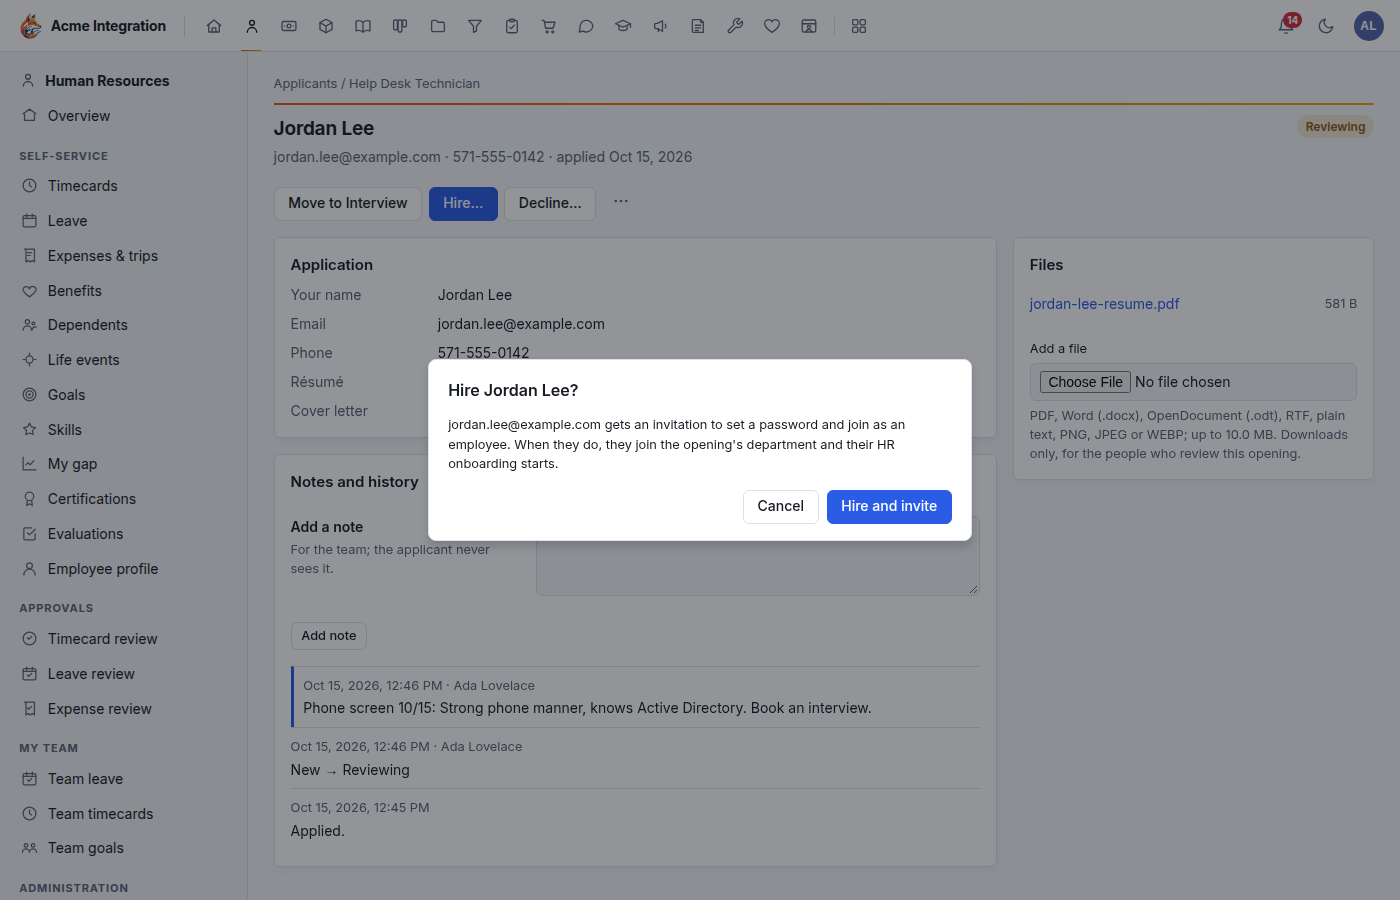
They get an email with a link to set their password. The link works once, for seven days. The applicant page shows the invitation and the start date.
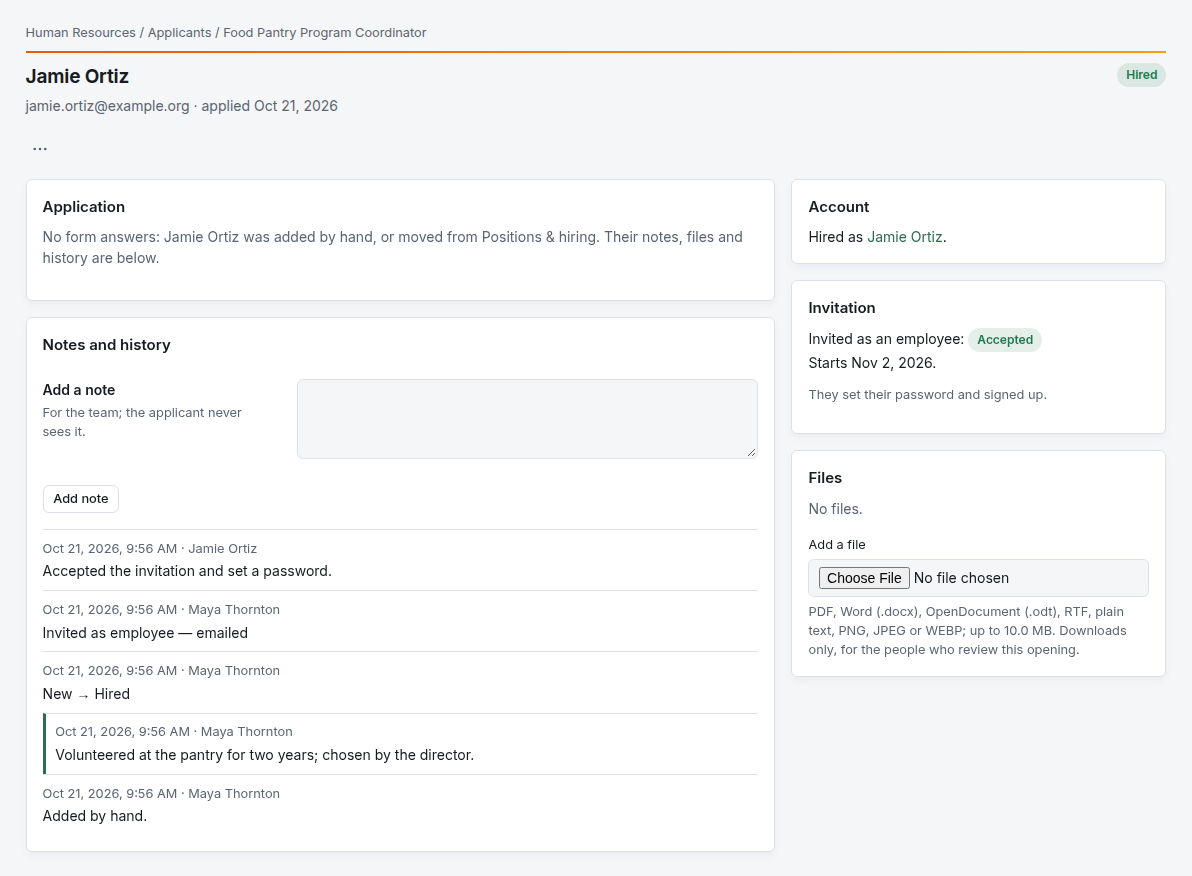
If the email didn't go, set up email, then use … → Re-send the invitation. The old link stops working.
8. They accept the invitation
The new hire opens the link and chooses a password: at least 12 characters, using 3 of uppercase, lowercase, digits and symbols.
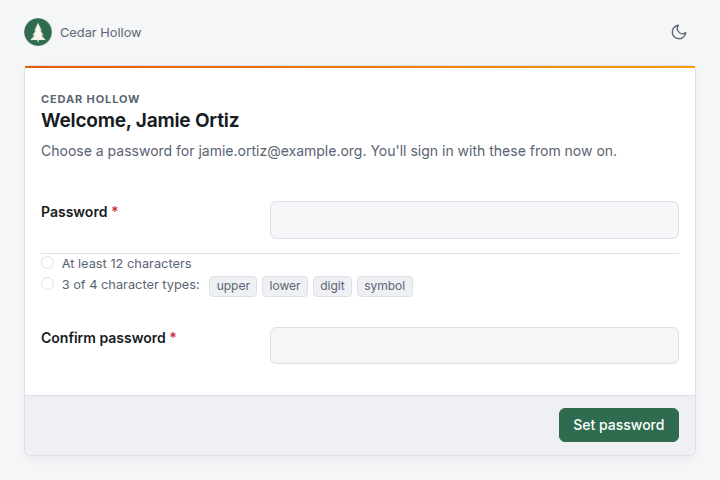
The moment they click Set password, Foxx HQ:
- creates their account as an employee;
- adds them to the opening's department as a member;
- fills in their HR record: job title, hire date, job profile, and the first line of their position history;
- starts their onboarding checklist from the template;
- opens their benefits enrollment window, if a plan year is active.
9. Work their onboarding checklist
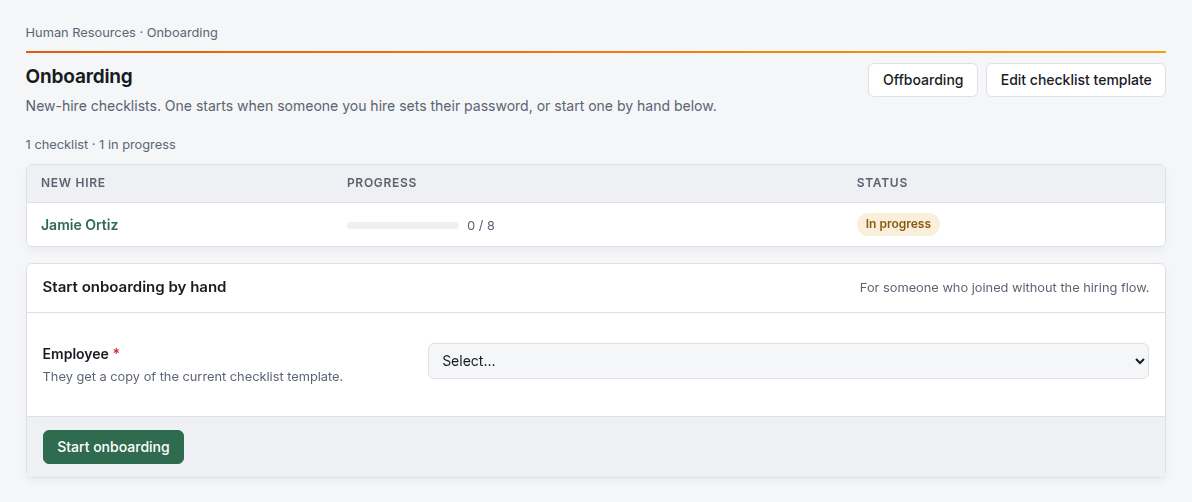
- Open Human Resources → Onboarding. Their checklist is listed with its progress.
- Click their name, then click Mark done on each task as it is done. Reopen undoes it.
A task with a linked form shows Awaiting form and has no button. It completes when the new hire submits the form.
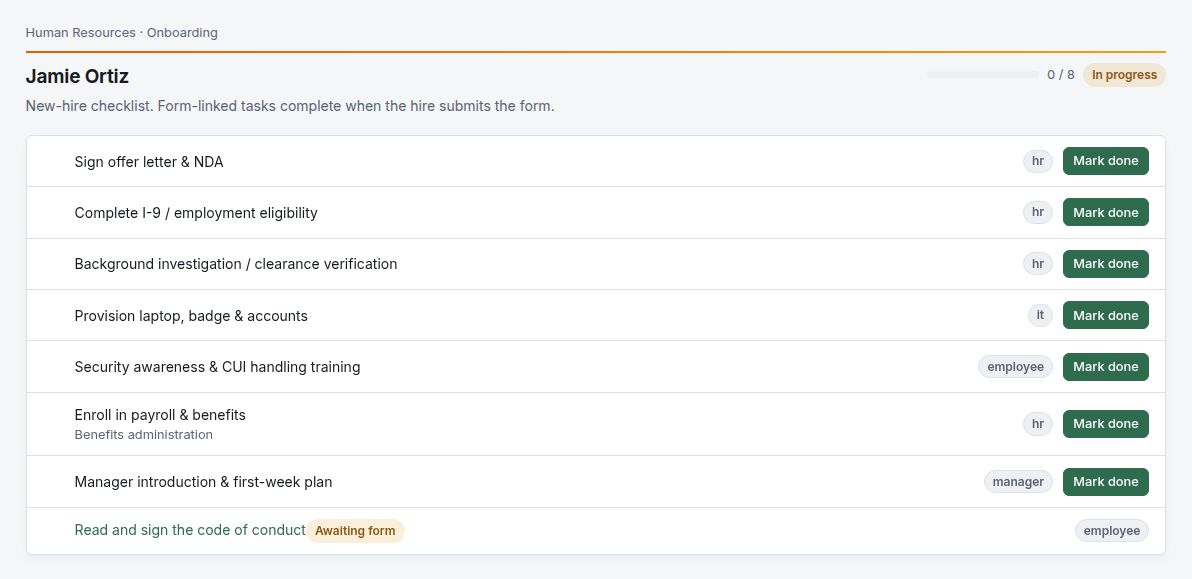
The new hire can't see this checklist. Only HR and their department's leads can.
10. Finish their record
Open Human Resources → HR directory and click their name.
- Profile: fill in the Employee number and Phone, and correct the Job title or Hire date if needed. Click Save profile.
- Who they report to: set it in My organization (in the workspace sidebar, under Manage). Their leave, timecards and expenses go to that person for approval.
- Lead instead of member: change their role on the department's Members card under Administration → Departments.
- Contractor: hiring always creates an employee, even for a Contract opening. Change their type under Administration → Users → the person → Person type. Contractors get no benefits and accrue no leave.
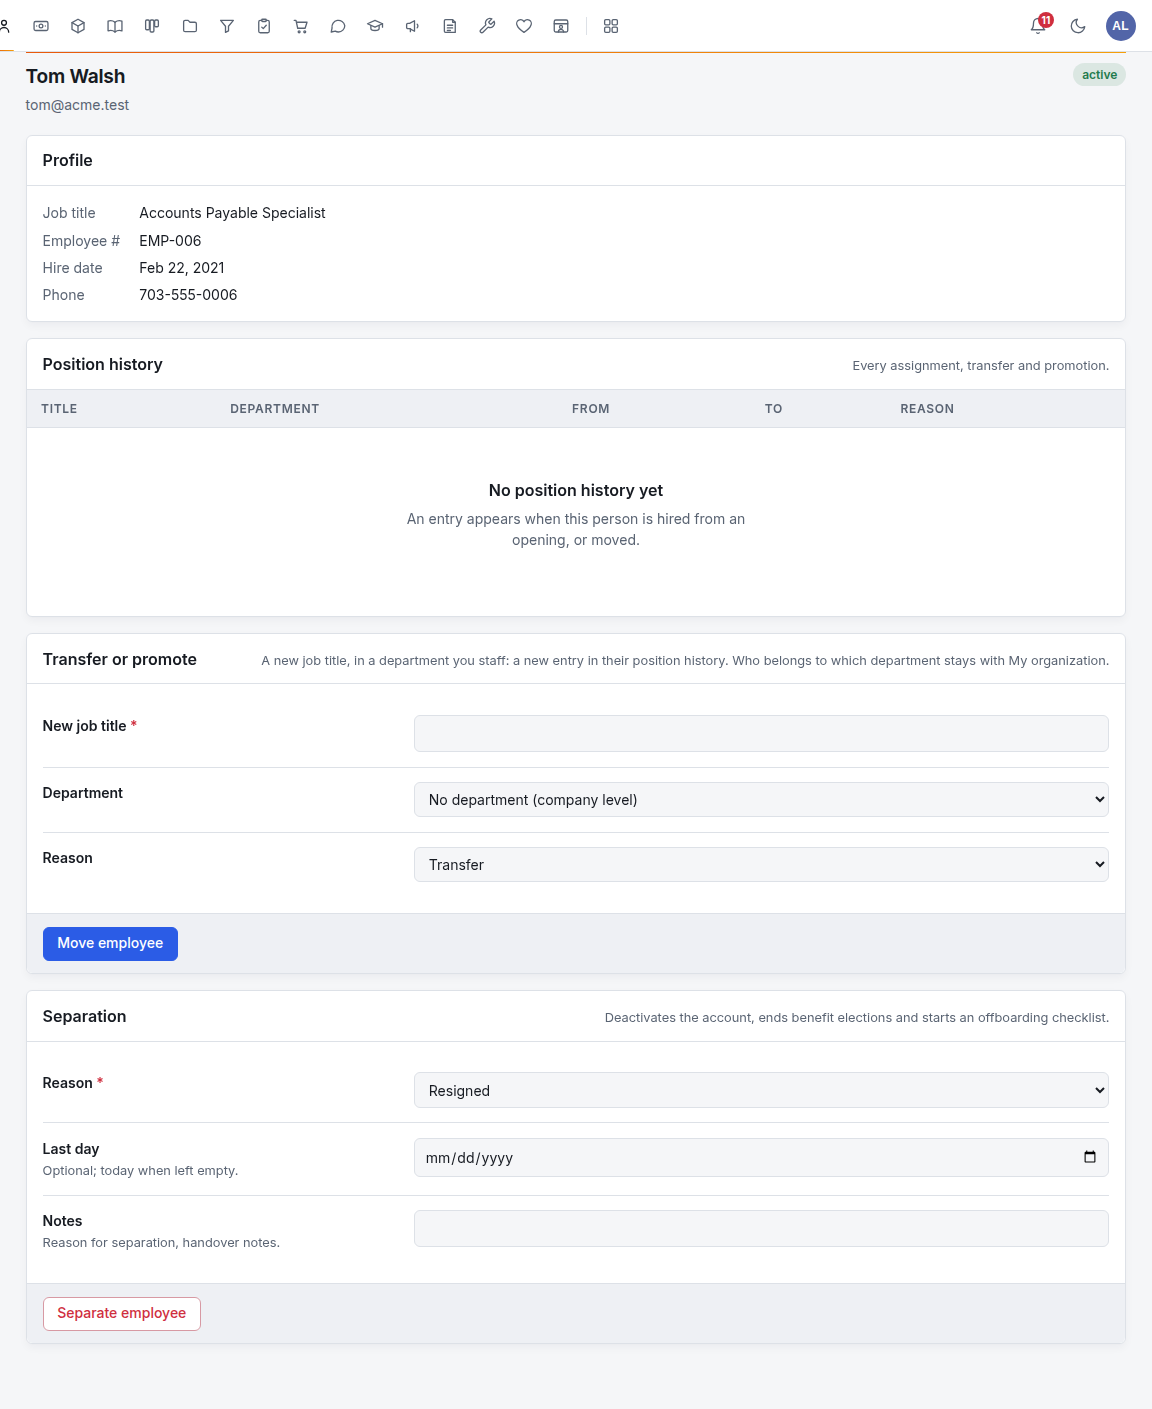
What the new hire sees
They sign in to the workspace and see Self-service in Human Resources: timecards, leave, expenses, benefits, goals, skills, certifications, evaluations and their employee profile. Forms from their checklist wait in their Inbox.
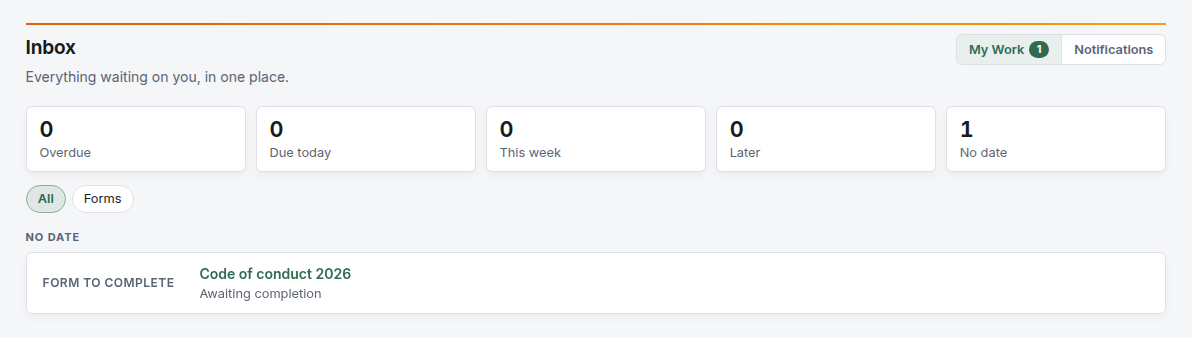
Good first things to point them at:
- Skills: rate themselves against their job profile. Their manager confirms the ratings under Skill validation, and My gap shows what the role still needs.
- Certifications: record credentials with their expiry dates.
- Timecards: their first week.
- Training: courses you assign them. See Training.
Someone who is already working
For a person who joined before you used Foxx HQ, skip the invitation:
- Administration → Users → New user: name, email and a temporary password. Give it to them in person or by phone. On their page, click Force reset so they choose their own at first sign-in. See Users, departments and teams.
- Add them to their department under Administration → Departments.
- Open their record in HR directory and fill in the Profile: job title, employee number, hire date and phone.
- Assign their role on the job profile's page: Assign this profile.
- If they still need onboarding, open Human Resources → Onboarding and use Start onboarding by hand.
This path writes no position history. Their first entry appears when you transfer or promote them.
Troubleshooting
The hire happened but no email went. Email isn't set up. Set it up under Administration → Email, then use … → Re-send the invitation on the applicant.
The invitation link says it expired or was used. Links work once, for seven days. Re-send the invitation; the new link replaces the old one.
"Already has an account here." The address belongs to an existing user. Use Someone who is already working instead.
No checklist appeared after they set their password. The checklist starts only for a hire from a staff opening. Start one by hand under Human Resources → Onboarding.
Their hire date is the day they accepted. No start date was entered when hiring. Correct it on their record in HR directory.
A task with a linked form says the form isn't available. The form isn't published. Publish it in Forms; onboardings started after that get it.